<?xml version="1.0" encoding="utf-8"?><feed xmlns="http://www.w3.org/2005/Atom" ><generator uri="https://jekyllrb.com/" version="3.10.0">Jekyll</generator><link href="https://morey.tech/feed.xml" rel="self" type="application/atom+xml" /><link href="https://morey.tech/" rel="alternate" type="text/html" /><updated>2026-05-18T17:18:34-04:00</updated><id>https://morey.tech/feed.xml</id><title type="html">Morey Tech</title><subtitle>Nicholas Morey is a Solutions Architect and Workshop Instructor, Passionate about Kubernetes, Platform Engineering, and GitOps.</subtitle><author><name>Nicholas Morey</name></author><entry><title type="html">Passing the RHCE: The Compounding Power of a Good System</title><link href="https://morey.tech/rants/Passing-the-RHCE/" rel="alternate" type="text/html" title="Passing the RHCE: The Compounding Power of a Good System" /><published>2026-05-17T20:00:00-04:00</published><updated>2026-05-17T20:00:00-04:00</updated><id>https://morey.tech/rants/Passing-the-RHCE</id><content type="html" xml:base="https://morey.tech/rants/Passing-the-RHCE/"><![CDATA[<p>I recently took the AU 294 training and passed the EX 294 exam to become a Red Hat Certified Engineer (RHCE). I managed to do this just in time for Red Hat’s announcements regarding updates to their certifications. What was a blanket RHCE before means I now hold the title of Red Hat Certified Engineer in Ansible, which is level three out of five (with Specialist and Architect as levels four and five).</p>

<p>Reaching this milestone has me reflecting on the journey, and specifically on how finding a rhythm and following it over time is compounding.</p>

<h2 id="the-backstory"><strong>The Backstory</strong></h2>

<p>Early in my career, I wanted so badly to complete some of the big-name certifications, like Cisco’s CCNA or the Red Hat Certified System Administrator (RHCSA). They eluded me for years. I had purchased the training for the RHCSA over a decade ago and never made it to the point of doing the certification exam.</p>

<p>In a <a href="/rants/Passing-the-RHCSA">previous post</a>, I wrote about the iterative steps I took to find a format that works well for me. For a long time, I tried different methods, like scheduling exams arbitrarily at a future date by counting back how much of a self-paced course I was going to do each month, or trying full instructor-led training.</p>

<p>Now, I can say that in 18 months, I’ve completed three certifications, which, for me, is wild. I am also planning to complete two more this year. What I want to focus on today is how the system is compounding over time.</p>

<h2 id="the-system-in-action"><strong>The System in Action</strong></h2>

<p>Here is the format I now follow once a quarter:</p>

<ul>
  <li><strong>The Format:</strong> A two-week, half-working-day, virtual instructor-led training.</li>
  <li><strong>The Balance:</strong> The half-days are really nice because they allow me to maintain the rest of my responsibilities and my role during the rest of the day. I can take meetings with clients in the afternoon, respond to emails during breaks, and catch up on anything I need to prepare in the evening.</li>
  <li><strong>The Exam Strategy:</strong> I book my exam for the following Monday after I’ve completed the training. This gives me a little bit of time over the weekend to catch up on any comprehensive labs from the course and practice.</li>
  <li><strong>The Retake:</strong> If I find out I failed an exam, I will book a retake for the Monday after that. This gives me the rest of the week while it’s still fresh, and another weekend to practice and prep, before going into it again.</li>
</ul>

<p>This system works really well for helping me to embrace the hard part of going through the coursework, doing the practice, and building that muscle memory in preparation for the exam.</p>

<h2 id="pacing-and-the-homelab"><strong>Pacing and the Homelab</strong></h2>

<p>Following this system once a quarter naturally paces me. The exam and the preparation are quite taxing from a workload perspective. It requires extending myself out into pursuing the formal certification. During this time, my partner, Dani, helps out at home by taking on extra responsibilities to give me more space to focus on the training, and especially on the days when I take my exams.</p>

<p>Doing this four times a year allows me to spend collectively about a month pursuing the formal certifications. Then, I end up spending the other two months circling back to my comfort zone: experimenting in my home lab. I need that time doing less structured, more experimental, hands-on work to recharge and build up the tolerance to do the formal training again next time.</p>

<h2 id="whats-next"><strong>What’s Next</strong></h2>

<p>I’m looking forward to deciding on my next path. I think I want to pursue the Red Hat Certified Architect in OpenShift. I am only one exam away from being a Red Hat Certified Engineer in OpenShift.</p>

<p>I might continue down the Ansible route, and then pivot back to OpenShift. Since I get a ton of OpenShift experience just working in my home lab and speaking with clients, focusing on Ansible for my certifications helps round me out a little bit more.</p>

<p>Ultimately, I’m really grateful to have the opportunity to pursue these certifications, to be in a role that enables me to do it, to have Dani’s support at home, and to have the time and space to have found a system that works well for me.</p>]]></content><author><name>Nicholas Morey</name></author><category term="Rants" /><category term="certifications" /><category term="red hat" /><summary type="html"><![CDATA[I recently took the AU 294 training and passed the EX 294 exam to become a Red Hat Certified Engineer (RHCE). I managed to do this just in time for Red Hat’s announcements regarding updates to their certifications. What was a blanket RHCE before means I now hold the title of Red Hat Certified Engineer in Ansible, which is level three out of five (with Specialist and Architect as levels four and five). Reaching this milestone has me reflecting on the journey, and specifically on how finding a rhythm and following it over time is compounding. The Backstory Early in my career, I wanted so badly to complete some of the big-name certifications, like Cisco’s CCNA or the Red Hat Certified System Administrator (RHCSA). They eluded me for years. I had purchased the training for the RHCSA over a decade ago and never made it to the point of doing the certification exam. In a previous post, I wrote about the iterative steps I took to find a format that works well for me. For a long time, I tried different methods, like scheduling exams arbitrarily at a future date by counting back how much of a self-paced course I was going to do each month, or trying full instructor-led training. Now, I can say that in 18 months, I’ve completed three certifications, which, for me, is wild. I am also planning to complete two more this year. What I want to focus on today is how the system is compounding over time. The System in Action Here is the format I now follow once a quarter: The Format: A two-week, half-working-day, virtual instructor-led training. The Balance: The half-days are really nice because they allow me to maintain the rest of my responsibilities and my role during the rest of the day. I can take meetings with clients in the afternoon, respond to emails during breaks, and catch up on anything I need to prepare in the evening. The Exam Strategy: I book my exam for the following Monday after I’ve completed the training. This gives me a little bit of time over the weekend to catch up on any comprehensive labs from the course and practice. The Retake: If I find out I failed an exam, I will book a retake for the Monday after that. This gives me the rest of the week while it’s still fresh, and another weekend to practice and prep, before going into it again. This system works really well for helping me to embrace the hard part of going through the coursework, doing the practice, and building that muscle memory in preparation for the exam. Pacing and the Homelab Following this system once a quarter naturally paces me. The exam and the preparation are quite taxing from a workload perspective. It requires extending myself out into pursuing the formal certification. During this time, my partner, Dani, helps out at home by taking on extra responsibilities to give me more space to focus on the training, and especially on the days when I take my exams. Doing this four times a year allows me to spend collectively about a month pursuing the formal certifications. Then, I end up spending the other two months circling back to my comfort zone: experimenting in my home lab. I need that time doing less structured, more experimental, hands-on work to recharge and build up the tolerance to do the formal training again next time. What’s Next I’m looking forward to deciding on my next path. I think I want to pursue the Red Hat Certified Architect in OpenShift. I am only one exam away from being a Red Hat Certified Engineer in OpenShift. I might continue down the Ansible route, and then pivot back to OpenShift. Since I get a ton of OpenShift experience just working in my home lab and speaking with clients, focusing on Ansible for my certifications helps round me out a little bit more. Ultimately, I’m really grateful to have the opportunity to pursue these certifications, to be in a role that enables me to do it, to have Dani’s support at home, and to have the time and space to have found a system that works well for me.]]></summary></entry><entry><title type="html">Stop Renting Your AI: The Strategic Case for Self-Hosted Models</title><link href="https://morey.tech/rants/Stop-Renting-Your-AI/" rel="alternate" type="text/html" title="Stop Renting Your AI: The Strategic Case for Self-Hosted Models" /><published>2026-05-12T20:00:00-04:00</published><updated>2026-05-12T20:00:00-04:00</updated><id>https://morey.tech/rants/Stop-Renting-Your-AI</id><content type="html" xml:base="https://morey.tech/rants/Stop-Renting-Your-AI/"><![CDATA[<p>Lately, I’ve been thinking a lot about privately hosted AI models—both large language models and smaller, purpose-built ones.</p>

<p>Right now, the default option for most of us is to use Software-as-a-Service (SaaS) AI models. We rely on the major players: Claude from Anthropic, Gemini from Google, or the solutions provided by Microsoft and OpenAI.</p>

<p>But there is a major challenge looming on the horizon: <strong>almost all of these SaaS AI solutions are currently being provided as loss leaders.</strong></p>

<p>These companies are investing billions of dollars into developing frontier models and the SaaS platforms that give you API access to them. Right now, they are actively providing these services at or below the cost to operate them. They are doing this to drive adoption, get people hooked on their services, and build a massive moat. Ultimately, the goal is to lock consumers into their specific AI ecosystem.</p>

<p>But eventually, the day of reckoning is going to come. These corporations are beholden to their shareholders and are legally obligated to produce a profit. They simply cannot continue this loss-leader model forever.</p>

<p>Once they capture a sufficient user base, they are going to start increasing the cost of these solutions until they become profitable—regardless of whether that new cost exceeds the value their users are actually getting from it.</p>

<p>Of course, there is the argument that they can leverage economies of scale. If they capture enough market share, perhaps they won’t have to increase costs significantly. And yes, there are peaks and troughs to the demand curve. If you corner the North American market and expand into the APAC region, the demand curve shifts, and in theory, you can fit more users into the same fixed capacity. There are also technologies that provide intelligent, context-aware routing of requests to make platforms more efficient.</p>

<p>But the reality is, that likely won’t be enough.</p>

<p>AI is one of those technologies where it is incredibly hard to squeeze out more efficiency as you scale. Each new user directly increases the demand on the system, requiring additional compute capacity. That wouldn’t be an issue if these providers had massive excess capacity sitting around, but nobody does. They are sprinting full speed ahead just to build out the capacity to meet <em>existing</em> demand. We aren’t going to reach a point anytime soon where bringing on a new user doesn’t force a provider to increase their costs.</p>

<p>And they will pass those costs on to you.</p>

<p>This is exactly why I advocate for having the infrastructure and the software to meet your AI demands with your own resources—or at the very least, building off a platform that is interoperable enough that you aren’t tied to one specific vendor.</p>

<p>This is where open-source models and projects like OpenShift AI have a huge impact. Open-source models are continuing to be highly competitive with frontier models, and more importantly, they let you pick <em>whatever hardware you want</em> to run them on.</p>

<p>If you spin up an AI platform today leveraging GPUs provided by Azure, there is nothing stopping you in the future from purchasing your own GPUs, migrating that platform to your own data center, and operating it at a relatively fixed cost over the lifespan of that hardware.</p>

<p>Of course, going this route—spinning up your own platform—comes with a trade-off.</p>

<p>It requires upfront effort, and it requires the right skill set in-house to make it work. Organizations have to weigh this investment against the risk of sticking with SaaS. And to be clear, I don’t just mean the standard, incremental cost increases due to inflation that every business plans for. I mean <em>significant</em> price hikes as these AI providers scramble to reach profitability in their delivery of these services.</p>

<p>By choosing to leverage open-source and open-standard solutions to host your own models, you are making a conscious choice to invest in your own organization. You are investing in your internal talent, your maturity, and your ability to deliver these services in-house.</p>

<p>Crucially, it also allows you to craft solutions that are hyper-domain specific to address the exact challenges your organization faces.</p>

<p>Is there a learning curve? Absolutely. But it is not exceedingly difficult.</p>

<p>If your organization is already hosting a Kubernetes cluster or you have a few data scientists on staff, you can get started fairly quickly. You build that initial footprint, and then you scale your maturity over time.</p>

<p>That in-house maturity is what allows you to make informed decisions. It empowers you to pick the right AI solutions and find the actual, practical opportunities to integrate a large language model into your workflows and operations.</p>

<p>The alternative is remaining ignorant to the realities of the technology—and inevitably getting sold on an AI-based solution that doesn’t actually help you deliver value to your end users or achieve your real outcomes.</p>

<p>Instead of waiting for your SaaS provider to hike their prices, invest in your own capabilities and take control of your AI infrastructure. Don’t get locked in.</p>]]></content><author><name>Nicholas Morey</name></author><category term="Rants" /><category term="ai" /><category term="business" /><summary type="html"><![CDATA[Lately, I’ve been thinking a lot about privately hosted AI models—both large language models and smaller, purpose-built ones. Right now, the default option for most of us is to use Software-as-a-Service (SaaS) AI models. We rely on the major players: Claude from Anthropic, Gemini from Google, or the solutions provided by Microsoft and OpenAI. But there is a major challenge looming on the horizon: almost all of these SaaS AI solutions are currently being provided as loss leaders. These companies are investing billions of dollars into developing frontier models and the SaaS platforms that give you API access to them. Right now, they are actively providing these services at or below the cost to operate them. They are doing this to drive adoption, get people hooked on their services, and build a massive moat. Ultimately, the goal is to lock consumers into their specific AI ecosystem. But eventually, the day of reckoning is going to come. These corporations are beholden to their shareholders and are legally obligated to produce a profit. They simply cannot continue this loss-leader model forever. Once they capture a sufficient user base, they are going to start increasing the cost of these solutions until they become profitable—regardless of whether that new cost exceeds the value their users are actually getting from it. Of course, there is the argument that they can leverage economies of scale. If they capture enough market share, perhaps they won’t have to increase costs significantly. And yes, there are peaks and troughs to the demand curve. If you corner the North American market and expand into the APAC region, the demand curve shifts, and in theory, you can fit more users into the same fixed capacity. There are also technologies that provide intelligent, context-aware routing of requests to make platforms more efficient. But the reality is, that likely won’t be enough. AI is one of those technologies where it is incredibly hard to squeeze out more efficiency as you scale. Each new user directly increases the demand on the system, requiring additional compute capacity. That wouldn’t be an issue if these providers had massive excess capacity sitting around, but nobody does. They are sprinting full speed ahead just to build out the capacity to meet existing demand. We aren’t going to reach a point anytime soon where bringing on a new user doesn’t force a provider to increase their costs. And they will pass those costs on to you. This is exactly why I advocate for having the infrastructure and the software to meet your AI demands with your own resources—or at the very least, building off a platform that is interoperable enough that you aren’t tied to one specific vendor. This is where open-source models and projects like OpenShift AI have a huge impact. Open-source models are continuing to be highly competitive with frontier models, and more importantly, they let you pick whatever hardware you want to run them on. If you spin up an AI platform today leveraging GPUs provided by Azure, there is nothing stopping you in the future from purchasing your own GPUs, migrating that platform to your own data center, and operating it at a relatively fixed cost over the lifespan of that hardware. Of course, going this route—spinning up your own platform—comes with a trade-off. It requires upfront effort, and it requires the right skill set in-house to make it work. Organizations have to weigh this investment against the risk of sticking with SaaS. And to be clear, I don’t just mean the standard, incremental cost increases due to inflation that every business plans for. I mean significant price hikes as these AI providers scramble to reach profitability in their delivery of these services. By choosing to leverage open-source and open-standard solutions to host your own models, you are making a conscious choice to invest in your own organization. You are investing in your internal talent, your maturity, and your ability to deliver these services in-house. Crucially, it also allows you to craft solutions that are hyper-domain specific to address the exact challenges your organization faces. Is there a learning curve? Absolutely. But it is not exceedingly difficult. If your organization is already hosting a Kubernetes cluster or you have a few data scientists on staff, you can get started fairly quickly. You build that initial footprint, and then you scale your maturity over time. That in-house maturity is what allows you to make informed decisions. It empowers you to pick the right AI solutions and find the actual, practical opportunities to integrate a large language model into your workflows and operations. The alternative is remaining ignorant to the realities of the technology—and inevitably getting sold on an AI-based solution that doesn’t actually help you deliver value to your end users or achieve your real outcomes. Instead of waiting for your SaaS provider to hike their prices, invest in your own capabilities and take control of your AI infrastructure. Don’t get locked in.]]></summary></entry><entry><title type="html">AI and ADRs: A Platform Engineering Love Story</title><link href="https://morey.tech/homelab/AI-and-ADRs/" rel="alternate" type="text/html" title="AI and ADRs: A Platform Engineering Love Story" /><published>2026-03-23T20:00:00-04:00</published><updated>2026-03-23T20:00:00-04:00</updated><id>https://morey.tech/homelab/AI-and-ADRs</id><content type="html" xml:base="https://morey.tech/homelab/AI-and-ADRs/"><![CDATA[<p>For years, I’ve always wanted to use Architecture Decision Records (ADRs) more in the crafting of my demonstrations and in my home lab. When you’re operating as a platform engineer or automation engineer in the world of Kubernetes, OpenShift, and Infrastructure as Code, there are a lot of decisions that get made. Documenting the “why” behind those choices is incredibly valuable.</p>

<p>In fact, back in July 2024, I even put the skeleton for a <a href="https://adr.github.io/madr/">Markdown Architecture Decision Record (MADR)</a> into my home lab repository. And then? I just never did anything with it.</p>

<p>In reality, it was never feasible for me to maintain them. It was way too burdensome—just a bunch of effort to write them out, evaluate all the options, manage the superseding of old records, and document it all while trying to move fast.</p>

<p>But here we are a couple of years later, and tools like Claude Code or Roo Code have completely changed the equation.</p>

<h3 id="the-openshift-software-factory-project"><strong>The OpenShift Software Factory Project</strong></h3>

<p>I’ve been working on a project for about a week now: a simple exercise to deploy a number of operators and operands to manage a fresh, pre-provisioned cluster. (Technically, it’s OpenShift on OpenShift, but to me, it just looks like a normal OpenShift cluster.)</p>

<p>I wanted to use Argo CD as much as possible and follow GitOps paradigms, while using Ansible for the initial bootstrapping. Why? Because <em>something</em> has to actually get the GitOps operator deployed to the cluster so it can respond to the applications you create. After that, Argo CD owns everything, and everything is managed with Kubernetes as the source of truth.</p>

<p>When putting together this demo repository, a lot of choices had to be made. But this time, I used AI to help me build the documentation alongside the code.</p>

<p>As the orchestrator, I get to determine what gets worked on and the approaches we take, while prompting Claude to review the changes made and document any pertinent architecture decisions in markdown. In just a week, I already have over 30 ADRs.</p>

<h3 id="the-ai--adr-feedback-loop"><strong>The AI + ADR Feedback Loop</strong></h3>

<p>These records have actually come really in handy because they’ve helped establish patterns I can refer Claude back to.</p>

<p>Of course, you could already do that to some extent. You could point Claude at an existing YAML manifest, a playbook, or a previous example to show it <em>how</em> you did something. That’s important. But the added documentation of an ADR provides the context on <em>why</em> those choices were made.</p>

<p>It creates a history. Already in this project, I’ve had previous ADRs superseded by new ones that address new capabilities or requirements that didn’t exist when the original choices were made.</p>

<p>Now, I can reference a past architecture decision and say, “I want you to implement X again, following the pattern documented here.” Claude has access to the code from last time, but it <em>also</em> has the broader context of why that approach was taken, so it can avoid making the same mistake again.</p>

<h3 id="a-real-world-example-leaving-room-for-imperativeness"><strong>A Real-World Example: Leaving Room for Imperativeness</strong></h3>

<p>Let me give you a concrete example of where this shines. Part of the goal of this project is portability. I should be able to take virtually any OpenShift cluster that meets the prerequisites—be it on-prem bare metal, managed in the cloud like Azure Red Hat OpenShift, or even OpenShift Local—and run this automation.</p>

<p>But I hit a snag: I had originally hardcoded the apps domain for my cluster in a Kustomize component stored in the Git repository. Because of that, I couldn’t just simply run the same bootstrapping against a different cluster.</p>

<p>So, alongside Claude Code, we came up with a solution to discover the apps domain at runtime and patch the GitLab instance. We established a pattern using a Kubernetes Job and Argo CD sync waves. Here’s how it works: on sync wave 0, the GitLab custom resource (CR) gets deployed to the cluster. On sync wave 1, a Job deploys that patches the GitLab CR with the cluster’s specific apps domain.</p>

<p>Now, granted, mutating state outside of Git is a bit of a GitOps anti-pattern. But at the very least, the Job and its logic are managed through GitOps, so I think it’s a fair compromise.</p>

<p>This also required us to practice a concept explained in the Argo CD documentation: <a href="https://argo-cd.readthedocs.io/en/stable/user-guide/best_practices/#leaving-room-for-imperativeness"><em>leaving room for imperativeness</em></a>. By explicitly omitting the host domain value from the custom resource in our Git repository, we let the Job inject it later. This brilliant little trick circumvents Argo CD constantly seeing an out-of-sync diff on that resource.</p>

<p>All of that logic, the rationale, the compromises, and the documentation that it supersedes the old Kustomize approach is completely captured in <a href="https://github.com/morey-tech/openshift-software-factory/blob/main/docs/decisions/0022-runtime-apps-domain-discovery-for-gitlab.md"><strong>ADR-0022: Runtime Apps Domain Discovery for GitLab</strong></a>.</p>

<p>Since writing that ADR, I’ve been able to easily replicate that exact same pattern multiple times for other areas in the bootstrapping process just by pointing the AI back to it.</p>

<h3 id="looking-forward"><strong>Looking Forward</strong></h3>

<p>It is incredibly easy to prompt AI to do the heavy lifting of writing the code and maintaining the documentation, while you guide the architecture. It took something that was practically unfeasible for me to manage alone and turned it into a seamless part of my workflow.</p>

<p>Frankly, I just find it fascinating, and I’m excited to see what a few years of operating like this accomplishes.</p>

<p><em>Curious to see what 30+ AI-assisted ADRs look like in practice? Check out the demo repository here:</em> <a href="https://github.com/morey-tech/openshift-software-factory"><strong>openshift-software-factory</strong></a></p>]]></content><author><name>Nicholas Morey</name></author><category term="Homelab" /><category term="openshift" /><category term="claude" /><category term="ai-assisted-coding" /><summary type="html"><![CDATA[For years, I’ve always wanted to use Architecture Decision Records (ADRs) more in the crafting of my demonstrations and in my home lab. When you’re operating as a platform engineer or automation engineer in the world of Kubernetes, OpenShift, and Infrastructure as Code, there are a lot of decisions that get made. Documenting the “why” behind those choices is incredibly valuable. In fact, back in July 2024, I even put the skeleton for a Markdown Architecture Decision Record (MADR) into my home lab repository. And then? I just never did anything with it. In reality, it was never feasible for me to maintain them. It was way too burdensome—just a bunch of effort to write them out, evaluate all the options, manage the superseding of old records, and document it all while trying to move fast. But here we are a couple of years later, and tools like Claude Code or Roo Code have completely changed the equation. The OpenShift Software Factory Project I’ve been working on a project for about a week now: a simple exercise to deploy a number of operators and operands to manage a fresh, pre-provisioned cluster. (Technically, it’s OpenShift on OpenShift, but to me, it just looks like a normal OpenShift cluster.) I wanted to use Argo CD as much as possible and follow GitOps paradigms, while using Ansible for the initial bootstrapping. Why? Because something has to actually get the GitOps operator deployed to the cluster so it can respond to the applications you create. After that, Argo CD owns everything, and everything is managed with Kubernetes as the source of truth. When putting together this demo repository, a lot of choices had to be made. But this time, I used AI to help me build the documentation alongside the code. As the orchestrator, I get to determine what gets worked on and the approaches we take, while prompting Claude to review the changes made and document any pertinent architecture decisions in markdown. In just a week, I already have over 30 ADRs. The AI + ADR Feedback Loop These records have actually come really in handy because they’ve helped establish patterns I can refer Claude back to. Of course, you could already do that to some extent. You could point Claude at an existing YAML manifest, a playbook, or a previous example to show it how you did something. That’s important. But the added documentation of an ADR provides the context on why those choices were made. It creates a history. Already in this project, I’ve had previous ADRs superseded by new ones that address new capabilities or requirements that didn’t exist when the original choices were made. Now, I can reference a past architecture decision and say, “I want you to implement X again, following the pattern documented here.” Claude has access to the code from last time, but it also has the broader context of why that approach was taken, so it can avoid making the same mistake again. A Real-World Example: Leaving Room for Imperativeness Let me give you a concrete example of where this shines. Part of the goal of this project is portability. I should be able to take virtually any OpenShift cluster that meets the prerequisites—be it on-prem bare metal, managed in the cloud like Azure Red Hat OpenShift, or even OpenShift Local—and run this automation. But I hit a snag: I had originally hardcoded the apps domain for my cluster in a Kustomize component stored in the Git repository. Because of that, I couldn’t just simply run the same bootstrapping against a different cluster. So, alongside Claude Code, we came up with a solution to discover the apps domain at runtime and patch the GitLab instance. We established a pattern using a Kubernetes Job and Argo CD sync waves. Here’s how it works: on sync wave 0, the GitLab custom resource (CR) gets deployed to the cluster. On sync wave 1, a Job deploys that patches the GitLab CR with the cluster’s specific apps domain. Now, granted, mutating state outside of Git is a bit of a GitOps anti-pattern. But at the very least, the Job and its logic are managed through GitOps, so I think it’s a fair compromise. This also required us to practice a concept explained in the Argo CD documentation: leaving room for imperativeness. By explicitly omitting the host domain value from the custom resource in our Git repository, we let the Job inject it later. This brilliant little trick circumvents Argo CD constantly seeing an out-of-sync diff on that resource. All of that logic, the rationale, the compromises, and the documentation that it supersedes the old Kustomize approach is completely captured in ADR-0022: Runtime Apps Domain Discovery for GitLab. Since writing that ADR, I’ve been able to easily replicate that exact same pattern multiple times for other areas in the bootstrapping process just by pointing the AI back to it. Looking Forward It is incredibly easy to prompt AI to do the heavy lifting of writing the code and maintaining the documentation, while you guide the architecture. It took something that was practically unfeasible for me to manage alone and turned it into a seamless part of my workflow. Frankly, I just find it fascinating, and I’m excited to see what a few years of operating like this accomplishes. Curious to see what 30+ AI-assisted ADRs look like in practice? Check out the demo repository here: openshift-software-factory]]></summary></entry><entry><title type="html">Passing the RCHSA: It Took Me Years!</title><link href="https://morey.tech/rants/Passing-the-RHCSA/" rel="alternate" type="text/html" title="Passing the RCHSA: It Took Me Years!" /><published>2026-02-16T19:00:00-05:00</published><updated>2026-02-16T19:00:00-05:00</updated><id>https://morey.tech/rants/Passing-the-RHCSA</id><content type="html" xml:base="https://morey.tech/rants/Passing-the-RHCSA/"><![CDATA[<p>It took me years, but I’m proud to say I am officially a Red Hat Certified System Administrator (RHCSA).</p>

<p>Back when I was a full-time Linux Sysadmin managing production RHEL systems, this exam felt like a mountain. I knew I was competent, but the exam intimidated me—especially since I had zero formal training on SELinux (and frankly, back then, we usually just turned it off!).</p>

<p>Over the years, I tried multiple times to prepare for the exam. I started the O’Reilly self-paced training, but couldn’t keep up. Last year, now as a Red Hat employee (and having built some confidence passing my RHCOA), I signed up for the self-paced RH199 rapid-track course. I scheduled the exam months out to create some pressure.</p>

<p>The result? I barely finished the early chapters, priorities took over, and I cancelled the exam at the last second.</p>

<p>That’s when I finally accepted something important: Self-paced training just doesn’t work for me. It’s not a fault; it’s just a characteristic of how I learn. I realized, for certifications, I need the gentle accountability of group or class-based environments.</p>

<p>So, I changed my strategy:</p>
<ul>
  <li>Signed up for virtual Instructor-Led Training (vILT).</li>
  <li>Completed 2 weeks of morning classes (squeezing my normal workload into the afternoons).</li>
  <li>Spent a 3-day weekend practicing the labs.</li>
  <li>Took the exam the morning after the weekend.</li>
</ul>

<p>It was a long couple of weeks. Thank you to my wife for bearing with me—I couldn’t have done it without your support.</p>]]></content><author><name>Nicholas Morey</name></author><category term="Rants" /><category term="certifications" /><category term="red hat" /><summary type="html"><![CDATA[It took me years, but I’m proud to say I am officially a Red Hat Certified System Administrator (RHCSA). Back when I was a full-time Linux Sysadmin managing production RHEL systems, this exam felt like a mountain. I knew I was competent, but the exam intimidated me—especially since I had zero formal training on SELinux (and frankly, back then, we usually just turned it off!). Over the years, I tried multiple times to prepare for the exam. I started the O’Reilly self-paced training, but couldn’t keep up. Last year, now as a Red Hat employee (and having built some confidence passing my RHCOA), I signed up for the self-paced RH199 rapid-track course. I scheduled the exam months out to create some pressure. The result? I barely finished the early chapters, priorities took over, and I cancelled the exam at the last second. That’s when I finally accepted something important: Self-paced training just doesn’t work for me. It’s not a fault; it’s just a characteristic of how I learn. I realized, for certifications, I need the gentle accountability of group or class-based environments. So, I changed my strategy: Signed up for virtual Instructor-Led Training (vILT). Completed 2 weeks of morning classes (squeezing my normal workload into the afternoons). Spent a 3-day weekend practicing the labs. Took the exam the morning after the weekend. It was a long couple of weeks. Thank you to my wife for bearing with me—I couldn’t have done it without your support.]]></summary></entry><entry><title type="html">Automating Claude Code in OpenShift Dev Spaces</title><link href="https://morey.tech/homelab/DevSpaces-Auto-Claude/" rel="alternate" type="text/html" title="Automating Claude Code in OpenShift Dev Spaces" /><published>2026-01-04T19:00:00-05:00</published><updated>2026-01-04T19:00:00-05:00</updated><id>https://morey.tech/homelab/DevSpaces-Auto-Claude</id><content type="html" xml:base="https://morey.tech/homelab/DevSpaces-Auto-Claude/"><![CDATA[<p>I’ve been working a lot with Red Hat <a href="https://developers.redhat.com/products/openshift-dev-spaces">OpenShift Dev Spaces</a> lately (the upstream project is <a href="https://github.com/eclipse-che/che">Eclipse Che</a>). Many of my customers are fascinated by the idea of completely codified, self-contained development environments. They love that these environments run on their own infrastructure, giving them full control over the development domain, security permissions, and performance.</p>

<p>One of the massive benefits of Dev Spaces is the ability to “codify” the entire environment—the tooling, the pre-baked commands, and the infrastructure around it.</p>

<p>For example, Dev Spaces provides a simple way to automatically authenticate a developer to GitHub using a GitHub OAuth application. This means every development environment spun up is already authenticated; it has the <code class="language-plaintext highlighter-rouge">git</code> CLI configured, it connects to private repositories, and it can push branches and commits based on permissions defined on the GitHub side.</p>

<p><img src="/assets/gifs/devspaces-gh-pr-ext-sign-in.gif" alt="Demonstrating the GitHub Pull Request extension opening, clicking &quot;Sign In,&quot; and it automatically authenticating without pasting tokens." /></p>

<p>I wanted to take this exact pattern and apply it to <strong>Claude Code</strong>.</p>

<p>My goal was simple: I want my Dev Spaces to launch with the Claude Code extension already installed, and—crucially—automatically authenticated. I want to jump straight into the coding task I spun the environment up for, without fiddling with login commands.</p>

<p>Here is how I accomplished that.</p>

<p><img src="/assets/gifs/devspaces-create-claude-code-test.gif" alt="Demonstrating creating a new devspace, the extension being installed, and opening it to test that it's authenicated." /></p>

<h1 id="prerequisites-getting-the-extension">Prerequisites: Getting the Extension</h1>

<p>Before handling authentication, we need to ensure the extension actually installs.</p>

<p>By default, the Che Cluster might use a limited subset of extensions. To access Claude Code, you need to configure the Che Cluster to use the <strong>Open VSX</strong> plugin repository. Since Claude Code is published to Open VSX, this makes it available for discovery.</p>

<div class="language-yaml highlighter-rouge"><div class="highlight"><pre class="highlight"><code><span class="na">kind</span><span class="pi">:</span> <span class="s">CheCluster</span>
<span class="na">apiVersion</span><span class="pi">:</span> <span class="s">org.eclipse.che/v2</span>
<span class="na">metadata</span><span class="pi">:</span>
  <span class="na">name</span><span class="pi">:</span> <span class="s">devspaces</span>
  <span class="na">namespace</span><span class="pi">:</span> <span class="s">openshift-devspaces</span>
<span class="na">spec</span><span class="pi">:</span>
  <span class="na">components</span><span class="pi">:</span>
    <span class="na">pluginRegistry</span><span class="pi">:</span>
      <span class="na">openVSXURL</span><span class="pi">:</span> <span class="s">https://open-vsx.org</span>  <span class="c1"># &lt;---</span>
</code></pre></div></div>

<p>To force the extension to install automatically when the Dev Space launches, I include a <code class="language-plaintext highlighter-rouge">.vscode/extensions.json</code> file in the repository I’m working on.</p>

<p><strong>File:</strong> .vscode/extensions.json</p>

<div class="language-json highlighter-rouge"><div class="highlight"><pre class="highlight"><code><span class="p">{</span><span class="w">
  </span><span class="nl">"recommendations"</span><span class="p">:</span><span class="w"> </span><span class="p">[</span><span class="w">
    </span><span class="s2">"Anthropic.claude-code"</span><span class="w">
  </span><span class="p">]</span><span class="w">
</span><span class="p">}</span><span class="w">
</span></code></pre></div></div>

<h1 id="the-authentication-strategy-api-key-vs-oauth">The Authentication Strategy: API Key vs. OAuth</h1>

<p>To automate the login, I needed to pass credentials into the environment.</p>

<p>While it is technically possible to use a <a href="https://claude.com/pricing">Claude Code subscription</a> (via an OAuth token), I found that approach flaky. I was worried the token generated via the CLI would be short-lived and expire, requiring me to constantly update my secrets.</p>

<p>Instead, I opted for an <a href="https://claude.com/pricing#api"><strong>Anthropic API Key</strong></a>.</p>

<p>There was also a cost factor. I initially started with the Claude Code Pro subscription (~$20 CAD/month) but hit session limits constantly. I switched to Claude Code Max (~$140 CAD/month) to avoid those limits, but I felt I was horribly underutilizing it. By switching to an API Key, I pay only for usage. This creates a more stable authentication method that is strictly pay-per-use, which works better for my lab environment.</p>

<h1 id="the-implementation-external-secrets">The Implementation: External Secrets</h1>

<p>To get the API key into the cluster securely, I used <strong>External Secrets Operator (ESO)</strong>.</p>

<p><em>Note: While ESO isn’t strictly required, I highly recommend it. My backing store is <a href="/technical%20blog/Bitwarden-And-External-Secrets/">a cobbled-together Bitwarden solution </a>(fine for my homelab), but for production, you should use HashiCorp Vault or something similar.</em></p>

<h2 id="the-challenge-namespaces">The Challenge: Namespaces</h2>

<p>Dev Spaces are created in user-specific namespaces. For example, my user is <code class="language-plaintext highlighter-rouge">admin</code>, so my workspaces spin up in a namespace called <code class="language-plaintext highlighter-rouge">admin-devspaces</code>.</p>

<p>If I used a standard <code class="language-plaintext highlighter-rouge">ExternalSecret</code>, it would have a 1-to-1 relationship with a secret in a single namespace. To make this API key available to <strong>all</strong> users spawning Dev Spaces, I needed a <code class="language-plaintext highlighter-rouge">**ClusterExternalSecret**</code>.</p>

<p>Dev Spaces namespaces automatically have the label <code class="language-plaintext highlighter-rouge">component: workspaces-namespace</code>. I configured the Cluster External Secret to replicate the Anthropic API key secret into any namespace matching that label.</p>

<div class="language-yaml highlighter-rouge"><div class="highlight"><pre class="highlight"><code><span class="na">apiVersion</span><span class="pi">:</span> <span class="s">external-secrets.io/v1</span>
<span class="na">kind</span><span class="pi">:</span> <span class="s">ClusterExternalSecret</span>
<span class="na">metadata</span><span class="pi">:</span>
  <span class="na">name</span><span class="pi">:</span> <span class="s">claude-code-api-key</span>
<span class="na">spec</span><span class="pi">:</span>
  <span class="c1">#...</span>
  <span class="na">namespaceSelector</span><span class="pi">:</span>
    <span class="na">matchLabels</span><span class="pi">:</span>
      <span class="na">app.kubernetes.io/component</span><span class="pi">:</span> <span class="s">workspaces-namespace</span>
</code></pre></div></div>

<h2 id="the-secret-configuration">The Secret Configuration</h2>

<p>The secret itself needs specific labels and annotations to tell the Dev Workspace controller to:</p>

<ol>
  <li>Watch the secret for updates.</li>
  <li>Mount the values of the secret as environment variables within the workspace.</li>
</ol>

<div class="language-yaml highlighter-rouge"><div class="highlight"><pre class="highlight"><code><span class="na">apiVersion</span><span class="pi">:</span> <span class="s">external-secrets.io/v1</span>
<span class="na">kind</span><span class="pi">:</span> <span class="s">ClusterExternalSecret</span>
<span class="na">metadata</span><span class="pi">:</span>
  <span class="na">name</span><span class="pi">:</span> <span class="s">claude-code-api-key</span>
<span class="na">spec</span><span class="pi">:</span>
  <span class="c1">#...</span>
        <span class="na">metadata</span><span class="pi">:</span>
          <span class="na">labels</span><span class="pi">:</span>
            <span class="c1"># Required for DevWorkspace controller to mount into workspaces</span>
            <span class="na">controller.devfile.io/mount-to-devworkspace</span><span class="pi">:</span> <span class="s1">'</span><span class="s">true'</span>
            <span class="na">controller.devfile.io/watch-secret</span><span class="pi">:</span> <span class="s1">'</span><span class="s">true'</span>
          <span class="na">annotations</span><span class="pi">:</span>
            <span class="c1"># Mount secret data as environment variables</span>
            <span class="na">controller.devfile.io/mount-as</span><span class="pi">:</span> <span class="s">env</span>
</code></pre></div></div>

<h1 id="the-gotcha-the-apikeyhelper">The “Gotcha”: The apiKeyHelper</h1>

<p>According to <a href="https://code.claude.com/docs/en/settings#environment-variables">the Claude Code documentation</a>, simply having the API key available as an environment variable <code class="language-plaintext highlighter-rouge">ANTHROPIC_API_KEY</code> <em>should</em> be enough.</p>

<p>However, after hours of research and trial and error (and reading <a href="https://github.com/anthropics/claude-code/issues/441">GitHub issues</a> from frustrated users), I found that the VS Code extension and CLI often failed to pick up the variable automatically.</p>

<p>The fix was a specific setting in the repository configuration. I had to create a local settings file that explicitly tells Claude Code how to find the key.</p>

<p><strong>File:</strong> <code class="language-plaintext highlighter-rouge">.claude/settings.local.json</code></p>

<div class="language-json highlighter-rouge"><div class="highlight"><pre class="highlight"><code><span class="p">{</span><span class="w">
    </span><span class="nl">"apiKeyHelper"</span><span class="p">:</span><span class="w"> </span><span class="s2">"bash -c 'echo $ANTHROPIC_API_KEY'"</span><span class="w">
</span><span class="p">}</span><span class="w">
</span></code></pre></div></div>

<p>This <code class="language-plaintext highlighter-rouge">apiKeyHelper</code> command effectively echoes the environment variable (mounted by our Secret) back to the extension. Once I added this, the extension authenticated immediately upon launch.</p>

<h1 id="areas-for-improvement">Areas for Improvement</h1>

<p>While this setup works, it still relies on “opt-in” configuration files living inside the repository (<code class="language-plaintext highlighter-rouge">.vscode/extensions.json</code> and <code class="language-plaintext highlighter-rouge">.claude/settings.local.json</code>). My ideal end-state is to remove this repository dependence entirely, making AI readiness a platform capability rather than a repository feature.</p>

<ol>
  <li><strong>Global Default Extensions:</strong> I want to configure the Che Cluster instance to include Claude Code in the default set of extensions for the VS Code editor definition. This would mean <em>every</em> Dev Space using the VS Code image would get the extension automatically, without needing a repository-level recommendation file.</li>
  <li><strong>Global Authentication Config:</strong> Similarly, I want to eliminate the <code class="language-plaintext highlighter-rouge">.claude/settings.local.json</code> requirement. If I can inject the <code class="language-plaintext highlighter-rouge">apiKeyHelper</code> setting (or fix the environment variable detection) at the IDE image or workspace configuration level, any Dev Space spun up on this cluster would be instantly authenticated.</li>
</ol>

<h1 id="summary">Summary</h1>

<p>By combining Open VSX, External Secrets, and a small configuration tweak in the <code class="language-plaintext highlighter-rouge">.claude</code> folder, I now have fully codified AI-ready environments. I can spin up a fresh Dev Space, and Claude is ready to help code immediately—no login required.</p>

<p>My next iteration will be to set up automatic configuration of Roo Code with my local LLM running on vLLM.</p>

<h1 id="further-reading">Further Reading</h1>
<p>Following the same intentions as this post, I set up automatic authenication for the <code class="language-plaintext highlighter-rouge">gh</code> CLI in my Dev Spaces using the GitHub OAuth application that already authenicated the <code class="language-plaintext highlighter-rouge">git</code> cli. Checkout the implementation <a href="https://github.com/morey-tech/homelab/blob/fa652f171eee64147ebb4849cf20b954b685136f/containers/devspace-base/gh-auth-init.sh">here</a>!</p>]]></content><author><name>Nicholas Morey</name></author><category term="Homelab" /><category term="openshift" /><category term="devspaces" /><category term="claude" /><category term="ai-assisted-coding" /><summary type="html"><![CDATA[I’ve been working a lot with Red Hat OpenShift Dev Spaces lately (the upstream project is Eclipse Che). Many of my customers are fascinated by the idea of completely codified, self-contained development environments. They love that these environments run on their own infrastructure, giving them full control over the development domain, security permissions, and performance. One of the massive benefits of Dev Spaces is the ability to “codify” the entire environment—the tooling, the pre-baked commands, and the infrastructure around it. For example, Dev Spaces provides a simple way to automatically authenticate a developer to GitHub using a GitHub OAuth application. This means every development environment spun up is already authenticated; it has the git CLI configured, it connects to private repositories, and it can push branches and commits based on permissions defined on the GitHub side. I wanted to take this exact pattern and apply it to Claude Code. My goal was simple: I want my Dev Spaces to launch with the Claude Code extension already installed, and—crucially—automatically authenticated. I want to jump straight into the coding task I spun the environment up for, without fiddling with login commands. Here is how I accomplished that. Prerequisites: Getting the Extension Before handling authentication, we need to ensure the extension actually installs. By default, the Che Cluster might use a limited subset of extensions. To access Claude Code, you need to configure the Che Cluster to use the Open VSX plugin repository. Since Claude Code is published to Open VSX, this makes it available for discovery. kind: CheCluster apiVersion: org.eclipse.che/v2 metadata: name: devspaces namespace: openshift-devspaces spec: components: pluginRegistry: openVSXURL: https://open-vsx.org # &lt;--- To force the extension to install automatically when the Dev Space launches, I include a .vscode/extensions.json file in the repository I’m working on. File: .vscode/extensions.json { "recommendations": [ "Anthropic.claude-code" ] } The Authentication Strategy: API Key vs. OAuth To automate the login, I needed to pass credentials into the environment. While it is technically possible to use a Claude Code subscription (via an OAuth token), I found that approach flaky. I was worried the token generated via the CLI would be short-lived and expire, requiring me to constantly update my secrets. Instead, I opted for an Anthropic API Key. There was also a cost factor. I initially started with the Claude Code Pro subscription (~$20 CAD/month) but hit session limits constantly. I switched to Claude Code Max (~$140 CAD/month) to avoid those limits, but I felt I was horribly underutilizing it. By switching to an API Key, I pay only for usage. This creates a more stable authentication method that is strictly pay-per-use, which works better for my lab environment. The Implementation: External Secrets To get the API key into the cluster securely, I used External Secrets Operator (ESO). Note: While ESO isn’t strictly required, I highly recommend it. My backing store is a cobbled-together Bitwarden solution (fine for my homelab), but for production, you should use HashiCorp Vault or something similar. The Challenge: Namespaces Dev Spaces are created in user-specific namespaces. For example, my user is admin, so my workspaces spin up in a namespace called admin-devspaces. If I used a standard ExternalSecret, it would have a 1-to-1 relationship with a secret in a single namespace. To make this API key available to all users spawning Dev Spaces, I needed a **ClusterExternalSecret**. Dev Spaces namespaces automatically have the label component: workspaces-namespace. I configured the Cluster External Secret to replicate the Anthropic API key secret into any namespace matching that label. apiVersion: external-secrets.io/v1 kind: ClusterExternalSecret metadata: name: claude-code-api-key spec: #... namespaceSelector: matchLabels: app.kubernetes.io/component: workspaces-namespace The Secret Configuration The secret itself needs specific labels and annotations to tell the Dev Workspace controller to: Watch the secret for updates. Mount the values of the secret as environment variables within the workspace. apiVersion: external-secrets.io/v1 kind: ClusterExternalSecret metadata: name: claude-code-api-key spec: #... metadata: labels: # Required for DevWorkspace controller to mount into workspaces controller.devfile.io/mount-to-devworkspace: 'true' controller.devfile.io/watch-secret: 'true' annotations: # Mount secret data as environment variables controller.devfile.io/mount-as: env The “Gotcha”: The apiKeyHelper According to the Claude Code documentation, simply having the API key available as an environment variable ANTHROPIC_API_KEY should be enough. However, after hours of research and trial and error (and reading GitHub issues from frustrated users), I found that the VS Code extension and CLI often failed to pick up the variable automatically. The fix was a specific setting in the repository configuration. I had to create a local settings file that explicitly tells Claude Code how to find the key. File: .claude/settings.local.json { "apiKeyHelper": "bash -c 'echo $ANTHROPIC_API_KEY'" } This apiKeyHelper command effectively echoes the environment variable (mounted by our Secret) back to the extension. Once I added this, the extension authenticated immediately upon launch. Areas for Improvement While this setup works, it still relies on “opt-in” configuration files living inside the repository (.vscode/extensions.json and .claude/settings.local.json). My ideal end-state is to remove this repository dependence entirely, making AI readiness a platform capability rather than a repository feature. Global Default Extensions: I want to configure the Che Cluster instance to include Claude Code in the default set of extensions for the VS Code editor definition. This would mean every Dev Space using the VS Code image would get the extension automatically, without needing a repository-level recommendation file. Global Authentication Config: Similarly, I want to eliminate the .claude/settings.local.json requirement. If I can inject the apiKeyHelper setting (or fix the environment variable detection) at the IDE image or workspace configuration level, any Dev Space spun up on this cluster would be instantly authenticated. Summary By combining Open VSX, External Secrets, and a small configuration tweak in the .claude folder, I now have fully codified AI-ready environments. I can spin up a fresh Dev Space, and Claude is ready to help code immediately—no login required. My next iteration will be to set up automatic configuration of Roo Code with my local LLM running on vLLM. Further Reading Following the same intentions as this post, I set up automatic authenication for the gh CLI in my Dev Spaces using the GitHub OAuth application that already authenicated the git cli. Checkout the implementation here!]]></summary></entry><entry><title type="html">My Time As Developer Advocate At Akuity</title><link href="https://morey.tech/career/Leaving-Akuity/" rel="alternate" type="text/html" title="My Time As Developer Advocate At Akuity" /><published>2024-09-08T20:00:00-04:00</published><updated>2024-09-08T20:00:00-04:00</updated><id>https://morey.tech/career/Leaving-Akuity</id><content type="html" xml:base="https://morey.tech/career/Leaving-Akuity/"><![CDATA[<h1 id="how-it-started">How It Started</h1>
<p>Two years ago, a sales engineer contacted me about <a href="https://akuity.io/">Akuity</a>, the company founded by the creators of the Argo Project. As always, I ignored the sales pitch. However, it prompted me to check out their website and careers page. I saw the open Developer Advocate position and immediately applied. I couldn’t pass up the chance to work with the world-class engineers behind Argo CD, a tool I use every day.</p>

<p>The thing was, I had no DevRel experience. Sure, I had a few blogs on my site (<a href="https://morey.tech/">morey.tech</a>). I also gave a couple of talks and hosted some lunch-n-learns internally. But I had no conference-level public speaking, video creation, or technical marketing experience. What I did have, however, was the right aptitude.</p>

<p>After chatting with Hong and completing several interviews, I conveyed my technical skills and passion for understanding and teaching others. I created a content proposal outlining the topics, the audiences, the problem statement, and the distribution of the resulting blog post. By this point, I had made my case as to why I would be a great fit as Akuity’s first Developer Advocate despite my lack of experience. And, I was persuaded to speak and write about Argo CD and the broader cloud-native ecosystem rather than being an infrastructure engineer and dealing with on-call (see my post from a few weeks ago).</p>

<h1 id="how-it-went">How It Went</h1>
<p>By the end of the first 90 days, I had written <a href="https://akuity.io/blog/argo-cd-architectures-explained/">a technical blog post</a> on a critical challenge that every Argo CD user faces and a central factor to the advantage of the Akuity Platform (which at the time was mainly Argo CD as a Service). I attended KubeCon for the first time, and it was also my first time working a booth at a conference. That week at KubeCon, I quickly learned how to ask the right questions to learn about how engineers were practicing GitOps (or not) in their organizations and how to pitch the value proposition of the Akuity Platform to suit their needs.</p>

<p>After 6 months, I developed an introduction and advanced workshop centred around Argo CD and GitOps. I had the privilege of presenting the intro workshop at SCaLE 20x and the advanced workshop at the Cisco headquarters in NYC the same week. Again, I had never given a workshop this formal to a group of strangers, yet I left both thrilled for the next time I could host one. From these workshops came new friends and a drive to do more training and education.</p>

<p>At 9 months in, I had created <a href="https://www.youtube.com/watch?v=MlAWr8bVr0I&amp;t=745s">a few YouTube videos</a> with over 30,000 views. I hosted several webinars about Argo CD, both in the open source and for the Akuity Platform. I designed <a href="https://academy.akuity.io/courses/gitops-argocd-intro">a self-paced Intro to Argo CD course</a> with quizzes, a hands-on lab with a series of challenges, and a proper certification badge for students. The course has now been taken by over 2,000 students and it continues to help new engineers get up to speed on Argo CD.</p>

<p>Rounding out my first year, I had the privilege of delivering my advanced GitOps <a href="https://www.linkedin.com/posts/nicholas-morey_gitops-activity-7102995981197025280-uz_8?utm_source=share&amp;utm_medium=member_desktop">workshop at the Red Hat HQ in Raleigh</a>. Out of all the workshops I gave, this was my favourite. The students were highly engaged, asking fantastic questions that showed a great understanding of the challenges organizations face implementing GitOps at scale.</p>

<p>Around the same time, I spoke at ArgoCon NA in Chicago. I presented alongside Carlos Santa about the <a href="https://youtu.be/ggJzfJgWO8c">GitOps Bridge for Terraform and Kubernetes</a>. The same day, I gave a workshop on <a href="https://youtu.be/Ns4MjCDKx7E">scaling cluster management with ApplicationSets</a>. It was an absolute pleasure to teach and connect with peers from the community. This ArgoCon was a highlight for me. A career goal of mine was to give a talk at a major conference, so getting to do two on the same day was unbelievable.</p>

<p>My second year feels like a blur because I had fully ramped up as a Developer Advocate by this point, and now it was time to deliver. I’m incredibly proud of my work on the Rendered Manifests Pattern. Between the blog post and <a href="https://youtu.be/TonN-369Qfo">my talk at ArgoCon EU in Paris</a>, over 10,000 people have learned about the risks introduced by hydrating manifests during reconciliation.</p>

<p>I had the opportunity to visit Denmark in partnership with AWS, meet with the platform teams of the largest organizations, and <a href="https://www.linkedin.com/posts/nicholas-morey_it-was-a-great-day-of-workshops-and-meeting-activity-7206307651285057539-edpT?utm_source=share&amp;utm_medium=member_desktop">deliver a workshop</a> to some of the country’s best platform engineers. While not strictly developer advocacy and leaning more towards the work of a Solutions Architect, this was some of the most exciting and interesting work I’ve done. Diving deeper into the barriers to implementation at these organizations was very rewarding for me.</p>

<p>Other notable highlights include:</p>
<ul>
  <li>Serving as the GitOps SME for Akuity’s largest customer</li>
  <li>Developing the <a href="https://training.linuxfoundation.org/certification/certified-argo-project-associate-capa/">Certified Argo Project Associate</a> exam for The Linux Foundation alongside a team of world-class open-source maintainers</li>
  <li>Establishing the Scalability Special Interest Group (SIG) for the Argo Project</li>
  <li>Delivering multi-day remote training to engineers at Fortune 500 companies.</li>
  <li>Serving as a program committee member for the last 3 ArgoCons.</li>
</ul>

<h1 id="how-it-ended">How It Ended</h1>
<p>In my two years at Akuity, I have grown more professionally and personally than in any other career role. I experienced so many firsts that it’s hard to count. I travelled to over 12 new cities across the US and Canada and to 5 new countries. I had experienced a ton of new foods, like Hot Pot and Korean BBQ, for the first time, sitting alongside my team at Akuity. I met people from various organizations and backgrounds that I would have never had the privilege of meeting outside of my role at Akuity.</p>

<p>The people are what I’m most thankful for. None of this success would have been possible without the fantastic team I worked alongside at Akuity. Their encouragement, feedback, and patience were vital to everything I accomplished at Akuity. Not to mention all the lovely people from the open-source community and partnerships. They made it fun to contribute to the broader community and kept me grounded in providing education to anyone that was willing to learn, customer or not.</p>

<p>That said, I have made the difficult decision to end my time at Akuity and pursue a role closer to home. With all I’ve accomplished over the last two years, I have also learned much about myself and what I need to thrive. I’ve come to understand where I want to focus my time and energy. And for that, I will be moving into a new role and company next week!</p>]]></content><author><name>Nicholas Morey</name></author><category term="Career" /><category term="career" /><summary type="html"><![CDATA[How It Started Two years ago, a sales engineer contacted me about Akuity, the company founded by the creators of the Argo Project. As always, I ignored the sales pitch. However, it prompted me to check out their website and careers page. I saw the open Developer Advocate position and immediately applied. I couldn’t pass up the chance to work with the world-class engineers behind Argo CD, a tool I use every day. The thing was, I had no DevRel experience. Sure, I had a few blogs on my site (morey.tech). I also gave a couple of talks and hosted some lunch-n-learns internally. But I had no conference-level public speaking, video creation, or technical marketing experience. What I did have, however, was the right aptitude. After chatting with Hong and completing several interviews, I conveyed my technical skills and passion for understanding and teaching others. I created a content proposal outlining the topics, the audiences, the problem statement, and the distribution of the resulting blog post. By this point, I had made my case as to why I would be a great fit as Akuity’s first Developer Advocate despite my lack of experience. And, I was persuaded to speak and write about Argo CD and the broader cloud-native ecosystem rather than being an infrastructure engineer and dealing with on-call (see my post from a few weeks ago). How It Went By the end of the first 90 days, I had written a technical blog post on a critical challenge that every Argo CD user faces and a central factor to the advantage of the Akuity Platform (which at the time was mainly Argo CD as a Service). I attended KubeCon for the first time, and it was also my first time working a booth at a conference. That week at KubeCon, I quickly learned how to ask the right questions to learn about how engineers were practicing GitOps (or not) in their organizations and how to pitch the value proposition of the Akuity Platform to suit their needs. After 6 months, I developed an introduction and advanced workshop centred around Argo CD and GitOps. I had the privilege of presenting the intro workshop at SCaLE 20x and the advanced workshop at the Cisco headquarters in NYC the same week. Again, I had never given a workshop this formal to a group of strangers, yet I left both thrilled for the next time I could host one. From these workshops came new friends and a drive to do more training and education. At 9 months in, I had created a few YouTube videos with over 30,000 views. I hosted several webinars about Argo CD, both in the open source and for the Akuity Platform. I designed a self-paced Intro to Argo CD course with quizzes, a hands-on lab with a series of challenges, and a proper certification badge for students. The course has now been taken by over 2,000 students and it continues to help new engineers get up to speed on Argo CD. Rounding out my first year, I had the privilege of delivering my advanced GitOps workshop at the Red Hat HQ in Raleigh. Out of all the workshops I gave, this was my favourite. The students were highly engaged, asking fantastic questions that showed a great understanding of the challenges organizations face implementing GitOps at scale. Around the same time, I spoke at ArgoCon NA in Chicago. I presented alongside Carlos Santa about the GitOps Bridge for Terraform and Kubernetes. The same day, I gave a workshop on scaling cluster management with ApplicationSets. It was an absolute pleasure to teach and connect with peers from the community. This ArgoCon was a highlight for me. A career goal of mine was to give a talk at a major conference, so getting to do two on the same day was unbelievable. My second year feels like a blur because I had fully ramped up as a Developer Advocate by this point, and now it was time to deliver. I’m incredibly proud of my work on the Rendered Manifests Pattern. Between the blog post and my talk at ArgoCon EU in Paris, over 10,000 people have learned about the risks introduced by hydrating manifests during reconciliation. I had the opportunity to visit Denmark in partnership with AWS, meet with the platform teams of the largest organizations, and deliver a workshop to some of the country’s best platform engineers. While not strictly developer advocacy and leaning more towards the work of a Solutions Architect, this was some of the most exciting and interesting work I’ve done. Diving deeper into the barriers to implementation at these organizations was very rewarding for me. Other notable highlights include: Serving as the GitOps SME for Akuity’s largest customer Developing the Certified Argo Project Associate exam for The Linux Foundation alongside a team of world-class open-source maintainers Establishing the Scalability Special Interest Group (SIG) for the Argo Project Delivering multi-day remote training to engineers at Fortune 500 companies. Serving as a program committee member for the last 3 ArgoCons. How It Ended In my two years at Akuity, I have grown more professionally and personally than in any other career role. I experienced so many firsts that it’s hard to count. I travelled to over 12 new cities across the US and Canada and to 5 new countries. I had experienced a ton of new foods, like Hot Pot and Korean BBQ, for the first time, sitting alongside my team at Akuity. I met people from various organizations and backgrounds that I would have never had the privilege of meeting outside of my role at Akuity. The people are what I’m most thankful for. None of this success would have been possible without the fantastic team I worked alongside at Akuity. Their encouragement, feedback, and patience were vital to everything I accomplished at Akuity. Not to mention all the lovely people from the open-source community and partnerships. They made it fun to contribute to the broader community and kept me grounded in providing education to anyone that was willing to learn, customer or not. That said, I have made the difficult decision to end my time at Akuity and pursue a role closer to home. With all I’ve accomplished over the last two years, I have also learned much about myself and what I need to thrive. I’ve come to understand where I want to focus my time and energy. And for that, I will be moving into a new role and company next week!]]></summary></entry><entry><title type="html">Bitwarden and External Secrets</title><link href="https://morey.tech/technical%20blog/Bitwarden-And-External-Secrets/" rel="alternate" type="text/html" title="Bitwarden and External Secrets" /><published>2024-03-07T19:00:00-05:00</published><updated>2024-03-07T19:00:00-05:00</updated><id>https://morey.tech/technical%20blog/Bitwarden-And-External-Secrets</id><content type="html" xml:base="https://morey.tech/technical%20blog/Bitwarden-And-External-Secrets/"><![CDATA[<p>I am a massive fan of <a href="https://bitwarden.com/">Bitwarden</a>. It’s my preferred password manager.</p>

<p>It’s open source and can be self-hosted. However, I prefer to offload that responsibility to them by using their SaaS offering. I have the same stance when it comes to secrets management for Kubernetes. I avoid running my own secrets store (e.g. Hashicorp Vault) because the solution is so complex yet crucial that I don’t want to be responsible for it when it breaks. I’ve been in that position before, and troubleshooting was always painful and not worth the effort in the end.</p>

<p>Nowadays, I prefer to pay for a service with a team of engineers responsible for keeping the solution stable and secure by offloading that responsibility onto cloud providers by utilizing services like <a href="https://cloud.google.com/security/products/secret-manager">Google Secret Manager</a>. So, when I discovered that External Secrets could integrate with Bitwarden, I was ecstatic.</p>

<p>If you are unaware, <a href="https://external-secrets.io/latest/"><strong>External Secrets</strong></a> is a Kubernetes operator that integrates secret management systems (e.g. Vault, AWS Secrets Manager, or GCP Secrets Manager). Based on <code class="language-plaintext highlighter-rouge">ExternalSecret</code> objects in the cluster, it connects to external <code class="language-plaintext highlighter-rouge">SecretStores</code> to retrieve the secrets and then populates Kubernetes Secrets with that data. The <code class="language-plaintext highlighter-rouge">ExternalSecret</code> object is perfectly safe to store in Git since it’s only a reference to the real secret values.</p>

<p><img src="/assets/images/Bitwarden%20External%20Secrets%20-%20ExternalSecret.png" alt="Diagram of ExternalSecret to Kubernetes Secret" /></p>

<p>I had intended to utilize GCP Secrets Manager as my <code class="language-plaintext highlighter-rouge">SecretStore</code> for my bare-metal Kubernetes cluster. It’s relatively cheap for my use case, likely costing me under $1 per month for the number of secrets and API calls my cluster would make. However, I already pay for and regularly use Bitwarden to manage my passwords, so it felt natural to use it for my Kubernetes secrets.</p>

<h1 id="implementation">Implementation</h1>

<p>Bitwarden is not one of the <a href="https://external-secrets.io/latest/provider/aws-secrets-manager/">official providers</a> for External Secrets. Instead, the integration uses the <a href="https://external-secrets.io/latest/provider/webhook/">webhook provider</a> and the Bitwarden CLI (bw). Using <a href="https://bitwarden.com/help/cli/#serve">the bw serve command</a>, the Bitwarden CLI can spin up a local webserver that will accept any command accessible from the CLI in the form of RESTful API calls. The External Secrets webhook provider can then connect to and request values from items in the Bitwarden vault.</p>

<p><img src="/assets/images/Bitwarden%20External%20Secrets%20-%20Connecting%20to%20CLI.png" alt="Diagram of External Secrets connecting to Bitwarden CLI" /></p>

<p>There is a guide in the External Secrets docs on <a href="https://external-secrets.io/latest/examples/bitwarden/">“Bitwarden support using webhook provider</a>”. This post will cover most of the same implementation, but I will go into my experience and more detail here.</p>

<h2 id="the-bitwarden-cli-container-image">The Bitwarden CLI Container Image</h2>

<p>The first challenge is that Bitwarden does <strong>not</strong> provide a container image with the CLI, so you must build one yourself. I maintain a GitHub repository with the Dockerfile, entry point script, and published container images here: <a href="https://github.com/morey-tech/container-bitwarden-cli">https://github.com/morey-tech/container-bitwarden-cli</a></p>

<div class="language-docker highlighter-rouge"><div class="highlight"><pre class="highlight"><code><span class="k">FROM</span><span class="s"> debian:sid</span>
<span class="k">ENV</span><span class="s"> BW_CLI_VERSION=2024.2.0</span>
<span class="k">RUN </span>apt update <span class="o">&amp;&amp;</span> <span class="se">\
</span>    apt <span class="nb">install</span> <span class="nt">-y</span> wget unzip <span class="o">&amp;&amp;</span> <span class="se">\
</span>    wget https://github.com/bitwarden/clients/releases/download/cli-v<span class="k">${</span><span class="nv">BW_CLI_VERSION</span><span class="k">}</span>/bw-linux-<span class="k">${</span><span class="nv">BW_CLI_VERSION</span><span class="k">}</span>.zip <span class="o">&amp;&amp;</span> <span class="se">\
</span>    unzip bw-linux-<span class="k">${</span><span class="nv">BW_CLI_VERSION</span><span class="k">}</span>.zip <span class="o">&amp;&amp;</span> <span class="se">\
</span>    <span class="nb">chmod</span> +x bw <span class="o">&amp;&amp;</span> <span class="se">\
</span>    <span class="nb">mv </span>bw /usr/local/bin/bw <span class="o">&amp;&amp;</span> <span class="se">\
</span>    <span class="nb">rm</span> <span class="nt">-rfv</span> <span class="k">*</span>.zip
<span class="k">COPY</span><span class="s"> entrypoint.sh /</span>
<span class="k">RUN </span><span class="nb">chmod</span> +x /entrypoint.sh
<span class="k">CMD</span><span class="s"> ["/entrypoint.sh"]</span>
</code></pre></div></div>

<p>The Dockerfile is pretty straight-forward. It will fetch the Bitwarden CLI from the official releases on GitHub at the specified version, install it into the image, copy in the entrypoint script, and make it executable.</p>

<div class="language-bash highlighter-rouge"><div class="highlight"><pre class="highlight"><code><span class="c">#!/bin/bash</span>
<span class="nb">set</span> <span class="nt">-e</span>
bw config server <span class="k">${</span><span class="nv">BW_HOST</span><span class="k">}</span>
bw login <span class="nt">--apikey</span>
<span class="nb">export </span><span class="nv">BW_SESSION</span><span class="o">=</span><span class="si">$(</span>bw unlock <span class="k">${</span><span class="nv">BW_PASSWORD</span><span class="k">}</span> <span class="nt">--raw</span><span class="si">)</span>
bw unlock <span class="nt">--check</span>
<span class="nb">echo</span> <span class="s1">'Running `bw server` on port 8087'</span>
bw serve <span class="nt">--hostname</span> 0.0.0.0
</code></pre></div></div>

<p>The entry point script will:</p>

<ul>
  <li>Configure the server with the host specified in the <code class="language-plaintext highlighter-rouge">BW_HOST</code> environment variable. If unset, it will default to the host for the Bitwarden SaaS offering.</li>
  <li>Authenticate the bw CLI using the API key specified in the environment variables. We’ll come back to this in a moment.</li>
  <li>Unlock the vault using the master password.</li>
  <li>Then, it spins up the local webserver using bw serve.</li>
</ul>

<h2 id="security">Security</h2>

<p>Oh yes, you read that correctly; the entry point script requires the master password for the Bitwarden account to function. In this case, it is stored in a Kubernetes Secret, which left me nervous about the solution. If a threat actor got access to the Kubernetes cluster and permissions to read secrets in the external-secrets namespace, they would gain access to the master password. Of course, this is unlikely given that the cluster is in a private network, behind the authentication and authorization of the Kubernetes api-server.</p>

<p>If they have already achieved that level of access, they could hit the Bitwarden webhook to access the secrets anyway. Using a <code class="language-plaintext highlighter-rouge">NetworkPolicy</code> to limit ingress traffic to only the external-secrets pods, I can mitigate that problem.</p>

<div class="language-yaml highlighter-rouge"><div class="highlight"><pre class="highlight"><code><span class="na">kind</span><span class="pi">:</span> <span class="s">NetworkPolicy</span>
<span class="na">apiVersion</span><span class="pi">:</span> <span class="s">networking.k8s.io/v1</span>
<span class="na">metadata</span><span class="pi">:</span>
  <span class="na">name</span><span class="pi">:</span> <span class="s">external-secret-2-bw-cli</span>
<span class="na">spec</span><span class="pi">:</span>
  <span class="na">podSelector</span><span class="pi">:</span>
    <span class="na">matchLabels</span><span class="pi">:</span>
      <span class="na">app.kubernetes.io/instance</span><span class="pi">:</span> <span class="s">bitwarden-cli</span>
      <span class="na">app.kubernetes.io/name</span><span class="pi">:</span> <span class="s">bitwarden-cli</span>
  <span class="na">ingress</span><span class="pi">:</span>
    <span class="pi">-</span> <span class="na">from</span><span class="pi">:</span>
      <span class="pi">-</span> <span class="na">podSelector</span><span class="pi">:</span>
          <span class="na">matchLabels</span><span class="pi">:</span>
            <span class="na">app.kubernetes.io/instance</span><span class="pi">:</span> <span class="s">external-secrets</span>
            <span class="na">app.kubernetes.io/name</span><span class="pi">:</span> <span class="s">external-secrets</span>
</code></pre></div></div>

<p>But, still, it made me uncomfortable. Having the master password to my personal Bitwarden account in my Kubernetes cluster, where I run services that are exposed to the open internet, is <strong>not</strong> something I was willing to do. However, I found a rather elegant compromise that worked out better overall.</p>

<h2 id="account-setup">Account Setup</h2>

<p>I’m already subscribed to the Bitwarden Families plan, which, for $3.33 per month, includes up to 6 users, of which I was using 2. The family plan is fantastic because you get access the organization feature to share password entries between users. In each organization, you can have collections of passwords with fine-grained permission control.</p>

<p>I’m sure you can see where I’m going with this; I created a Bitwarden user dedicated to the Kubernetes cluster. I added it to my organization, which gave it a premium subscription at no cost. Then, I created a collection in the organization dedicated to the cluster and gave that account read-only access.</p>

<p><img src="/assets/images/Bitwarden%20External%20Secrets%20-%20Account%20Setup.png" alt="Diagram of Bitwarden account setup" /></p>

<p>With this setup, I can create an entry in the collection from my primary personal Bitwarden account. And external-secrets in my Kubernetes cluster can retrieve values from that entry to populate Secrets used by services in the cluster.</p>

<h2 id="kubernetes-configuration">Kubernetes Configuration</h2>

<p>I’m a big fan of kustomize+helm, I think it’s the perfect combination of templating and last mile patching. But that’s a topic for another blog post. I use this combination for the deployment of external-secrets and the bitwarden-cli container I covered earlier.</p>

<div class="language-yaml highlighter-rouge"><div class="highlight"><pre class="highlight"><code><span class="na">apiVersion</span><span class="pi">:</span> <span class="s">kustomize.config.k8s.io/v1beta1</span>
<span class="na">kind</span><span class="pi">:</span> <span class="s">Kustomization</span>
<span class="na">namespace</span><span class="pi">:</span> <span class="s">external-secrets-system</span>
<span class="na">resources</span><span class="pi">:</span>
<span class="pi">-</span> <span class="s">bitwarden-cli-deploy.yaml</span>
<span class="pi">-</span> <span class="s">secret-stores.yaml</span>

<span class="na">helmCharts</span><span class="pi">:</span>
<span class="pi">-</span> <span class="na">name</span><span class="pi">:</span> <span class="s">external-secrets</span>
  <span class="na">includeCRDs</span><span class="pi">:</span> <span class="no">true</span>
  <span class="na">version</span><span class="pi">:</span> <span class="s">0.9.0</span>
  <span class="na">repo</span><span class="pi">:</span> <span class="s">https://charts.external-secrets.io</span>
  <span class="na">releaseName</span><span class="pi">:</span> <span class="s">external-secrets</span>
  <span class="na">namespace</span><span class="pi">:</span> <span class="s">external-secrets-system</span>
  <span class="na">valuesInline</span><span class="pi">:</span>
    <span class="na">resources</span><span class="pi">:</span>
      <span class="na">requests</span><span class="pi">:</span>
        <span class="na">cpu</span><span class="pi">:</span> <span class="s">100m</span>
        <span class="na">memory</span><span class="pi">:</span> <span class="s">256Mi</span>

<span class="na">images</span><span class="pi">:</span>
<span class="pi">-</span> <span class="na">name</span><span class="pi">:</span> <span class="s">ghcr.io/morey-tech/bitwarden-cli</span>
  <span class="na">newTag</span><span class="pi">:</span> <span class="s">v0.2.0</span>
</code></pre></div></div>

<p>This kustomization.yaml will deploy:</p>

<ul>
  <li>The <code class="language-plaintext highlighter-rouge">external-secrets</code> Helm chart to the <code class="language-plaintext highlighter-rouge">external-secrets-system</code> namespace. The <code class="language-plaintext highlighter-rouge">-system</code> suffix is specific to my environment.</li>
  <li>A <code class="language-plaintext highlighter-rouge">Deployment</code>, <code class="language-plaintext highlighter-rouge">Service</code>, and <code class="language-plaintext highlighter-rouge">NetworkPolicy</code> (as covered earlier) for the <code class="language-plaintext highlighter-rouge">bitwarden-cli</code> container with the tag <code class="language-plaintext highlighter-rouge">v0.2.0</code>.</li>
  <li>Three ClusterSecretStore resources that use the webhook provider to configure External Secrets to use the <code class="language-plaintext highlighter-rouge">bitwarden-cli</code> deployment. One of them is used to retrieve the standard username and password property, one is used to retrieve custom field properties, and the other is used to retrieve the note property. Each of these is a separate JSON path on the webhook, which is why they are separate secret stores.</li>
</ul>

<p>All of which can be committed into Git and deployed by Argo CD.</p>

<div class="language-yaml highlighter-rouge"><div class="highlight"><pre class="highlight"><code><span class="na">apiVersion</span><span class="pi">:</span> <span class="s">argoproj.io/v1alpha1</span>
<span class="na">kind</span><span class="pi">:</span> <span class="s">Application</span>
<span class="na">metadata</span><span class="pi">:</span>
  <span class="na">name</span><span class="pi">:</span> <span class="s">external-secrets</span>
  <span class="na">namespace</span><span class="pi">:</span> <span class="s">argocd</span>
<span class="na">spec</span><span class="pi">:</span>
  <span class="na">destination</span><span class="pi">:</span>
    <span class="na">namespace</span><span class="pi">:</span> <span class="s">external-secrets-system</span>
    <span class="na">server</span><span class="pi">:</span> <span class="s1">'</span><span class="s">https://kubernetes.default.svc'</span>
  <span class="na">project</span><span class="pi">:</span> <span class="s">default</span>
  <span class="na">source</span><span class="pi">:</span>
    <span class="na">path</span><span class="pi">:</span> <span class="s">environments/rubrik/system/external-secrets</span>
    <span class="na">repoURL</span><span class="pi">:</span> <span class="s1">'</span><span class="s">https://github.com/morey-tech/homelab.git'</span>
    <span class="na">targetRevision</span><span class="pi">:</span> <span class="s">HEAD</span>
  <span class="na">syncPolicy</span><span class="pi">:</span>
    <span class="na">automated</span><span class="pi">:</span>
      <span class="na">prune</span><span class="pi">:</span> <span class="no">true</span>
      <span class="na">selfHeal</span><span class="pi">:</span> <span class="no">true</span>
    <span class="na">syncOptions</span><span class="pi">:</span>
    <span class="pi">-</span> <span class="s">allowEmpty=true</span>
    <span class="pi">-</span> <span class="s">CreateNamespace=true</span>
</code></pre></div></div>

<p>What can’t be committed into the Git repository, is the Secret used by the <code class="language-plaintext highlighter-rouge">bitwarden-cli</code> <code class="language-plaintext highlighter-rouge">Deployment</code> to authenticate and unseal the Bitwarden vault. This is <a href="https://github.com/morey-tech/homelab/tree/main/environments/rubrik#how-to-bootstrap-the-cluster">one of two manual bootstrapping steps</a> that I have yet to automate. But it looks like this:</p>

<div class="language-yaml highlighter-rouge"><div class="highlight"><pre class="highlight"><code><span class="na">apiVersion</span><span class="pi">:</span> <span class="s">v1</span>
<span class="na">kind</span><span class="pi">:</span> <span class="s">Secret</span>
<span class="na">metadata</span><span class="pi">:</span>
  <span class="na">name</span><span class="pi">:</span> <span class="s">bitwarden-cli</span>
  <span class="na">namepsace</span><span class="pi">:</span> <span class="s">external-secrets-system</span>
<span class="na">type</span><span class="pi">:</span> <span class="s">Opaque</span>
<span class="na">data</span><span class="pi">:</span>
  <span class="c1"># The master password for the account.</span>
  <span class="na">BW_PASSWORD</span><span class="pi">:</span>
  <span class="c1"># https://bitwarden.com/help/personal-api-key/</span>
  <span class="na">BW_CLIENTID</span><span class="pi">:</span>
  <span class="na">BW_CLIENTSECRET</span><span class="pi">:</span> 
</code></pre></div></div>

<h1 id="bring-it-all-together">Bring It All Together</h1>

<p>This diagram brings it all together to show the full flow from when an <code class="language-plaintext highlighter-rouge">ExternalSecret</code> is created to editing secrets with my personal Bitwarden User:</p>

<p><img src="/assets/images/Bitwarden%20External%20Secrets%20-%20Bring%20it%20all%20together.png" alt="Full flow diagram of Bitwarden and ExternalSecrets" /></p>

<h2 id="usage">Usage</h2>

<p>With External Secrets deployed with the Bitwarden CLI alongside it, I am ready to populate Secrets in my cluster with values from password entires in my Bitwarden vault (specifically the collection in my organization). Using the <code class="language-plaintext highlighter-rouge">ExternalSecret</code> resource, I can define what the generated Secret should look like:</p>

<div class="language-yaml highlighter-rouge"><div class="highlight"><pre class="highlight"><code>
<span class="na">apiVersion</span><span class="pi">:</span> <span class="s">external-secrets.io/v1beta1</span>
<span class="na">kind</span><span class="pi">:</span> <span class="s">ExternalSecret</span>
<span class="na">metadata</span><span class="pi">:</span>
  <span class="na">name</span><span class="pi">:</span> <span class="s">example-secret</span>
<span class="na">spec</span><span class="pi">:</span>
  <span class="na">target</span><span class="pi">:</span>
    <span class="na">name</span><span class="pi">:</span> <span class="s">example-secret</span>
    <span class="na">deletionPolicy</span><span class="pi">:</span> <span class="s">Delete</span>
  <span class="na">template</span><span class="pi">:</span>
    <span class="na">type</span><span class="pi">:</span> <span class="s">Opaque</span>
    <span class="na">data</span><span class="pi">:</span>
      <span class="na">username</span><span class="pi">:</span> <span class="pi">|-</span>
        <span class="s">{{ .user }}</span>
      <span class="na">password</span><span class="pi">:</span> <span class="pi">|-</span>
        <span class="s">{{ .pass }}</span>
      <span class="na">testKey</span><span class="pi">:</span> <span class="pi">|-</span>
        <span class="s">{{ .testKey }}</span>
</code></pre></div></div>

<p>The keys in the double brackets (<code class="language-plaintext highlighter-rouge">{{ .key }}</code>) are references to the data section, which is where I defined which Bitwarden entry to take values from.</p>

<div class="language-yaml highlighter-rouge"><div class="highlight"><pre class="highlight"><code><span class="na">spec</span><span class="pi">:</span>
  <span class="c1"># ...</span>
  <span class="na">data</span><span class="pi">:</span>
  <span class="pi">-</span> <span class="na">secretKey</span><span class="pi">:</span> <span class="s">user</span>
    <span class="na">sourceRef</span><span class="pi">:</span>
      <span class="na">storeRef</span><span class="pi">:</span>
        <span class="na">name</span><span class="pi">:</span> <span class="s">bitwarden-login</span>
        <span class="na">kind</span><span class="pi">:</span> <span class="s">ClusterSecretStore</span>
    <span class="na">remoteRef</span><span class="pi">:</span>
      <span class="na">key</span><span class="pi">:</span> <span class="s">f98dbd25-e105-4555-c026-d121910ac03f</span>
      <span class="na">property</span><span class="pi">:</span> <span class="s">username</span>
</code></pre></div></div>

<p>In this example, using the <code class="language-plaintext highlighter-rouge">bitwarden-login</code> <code class="language-plaintext highlighter-rouge">ClusterSecretStore</code>, the <code class="language-plaintext highlighter-rouge">{{ .user }}</code> key is populated with the username property from the Bitwarden vault entry with the ID used in the <code class="language-plaintext highlighter-rouge">remoteRef.key</code>. Unfortunately, I can not find a way to retrieve the ID of an entry from the browser extension (though not surprising). So, to get this value, I have to log into the <a href="https://vault.bitwarden.com/#/login">Bitwarden web vault</a>, view the desired entry, and copy it from the <code class="language-plaintext highlighter-rouge">itemId=</code> attribute in the URL.</p>

<div class="language-yaml highlighter-rouge"><div class="highlight"><pre class="highlight"><code><span class="s">https://vault.bitwarden.com/#/vault?itemId=f98dbd25-e105-4555-c026-d121910ac03f</span>
</code></pre></div></div>

<p>Thankfully, because I’m using a separate Bitwarden account for External Secrets, I can keep that master password for it in my personal Bitwarden, making logging into the web vault a breeze. And, once I have that ID, I can paste it into the Bitwarden browser extension logged into my personal account to pull up the entry used in the <code class="language-plaintext highlighter-rouge">ExternalSecret</code>.</p>

<p><img src="/assets/images/Xnapper-2024-03-06-17.56.40.png" alt="Screenshot of ExternalSecret in Argo CD" /></p>

<h1 id="conclusion">Conclusion</h1>

<p>I wouldn’t recommend this approach for any significant production workload. Frankly, I may even out grow this solution and need to transition to proper secrets manager (e.g. one from <a href="https://bitwarden.com/products/secrets-manager/">Bitwarden</a> or Google) in the future. But for a single cluster in a homelab environment where you are already a Bitwarden user, it’s a super efficient secrets management solution.</p>]]></content><author><name>Nicholas Morey</name></author><category term="Technical Blog" /><category term="homelab" /><category term="kubernetes" /><summary type="html"><![CDATA[I am a massive fan of Bitwarden. It’s my preferred password manager. It’s open source and can be self-hosted. However, I prefer to offload that responsibility to them by using their SaaS offering. I have the same stance when it comes to secrets management for Kubernetes. I avoid running my own secrets store (e.g. Hashicorp Vault) because the solution is so complex yet crucial that I don’t want to be responsible for it when it breaks. I’ve been in that position before, and troubleshooting was always painful and not worth the effort in the end. Nowadays, I prefer to pay for a service with a team of engineers responsible for keeping the solution stable and secure by offloading that responsibility onto cloud providers by utilizing services like Google Secret Manager. So, when I discovered that External Secrets could integrate with Bitwarden, I was ecstatic. If you are unaware, External Secrets is a Kubernetes operator that integrates secret management systems (e.g. Vault, AWS Secrets Manager, or GCP Secrets Manager). Based on ExternalSecret objects in the cluster, it connects to external SecretStores to retrieve the secrets and then populates Kubernetes Secrets with that data. The ExternalSecret object is perfectly safe to store in Git since it’s only a reference to the real secret values. I had intended to utilize GCP Secrets Manager as my SecretStore for my bare-metal Kubernetes cluster. It’s relatively cheap for my use case, likely costing me under $1 per month for the number of secrets and API calls my cluster would make. However, I already pay for and regularly use Bitwarden to manage my passwords, so it felt natural to use it for my Kubernetes secrets. Implementation Bitwarden is not one of the official providers for External Secrets. Instead, the integration uses the webhook provider and the Bitwarden CLI (bw). Using the bw serve command, the Bitwarden CLI can spin up a local webserver that will accept any command accessible from the CLI in the form of RESTful API calls. The External Secrets webhook provider can then connect to and request values from items in the Bitwarden vault. There is a guide in the External Secrets docs on “Bitwarden support using webhook provider”. This post will cover most of the same implementation, but I will go into my experience and more detail here. The Bitwarden CLI Container Image The first challenge is that Bitwarden does not provide a container image with the CLI, so you must build one yourself. I maintain a GitHub repository with the Dockerfile, entry point script, and published container images here: https://github.com/morey-tech/container-bitwarden-cli FROM debian:sid ENV BW_CLI_VERSION=2024.2.0 RUN apt update &amp;&amp; \ apt install -y wget unzip &amp;&amp; \ wget https://github.com/bitwarden/clients/releases/download/cli-v${BW_CLI_VERSION}/bw-linux-${BW_CLI_VERSION}.zip &amp;&amp; \ unzip bw-linux-${BW_CLI_VERSION}.zip &amp;&amp; \ chmod +x bw &amp;&amp; \ mv bw /usr/local/bin/bw &amp;&amp; \ rm -rfv *.zip COPY entrypoint.sh / RUN chmod +x /entrypoint.sh CMD ["/entrypoint.sh"] The Dockerfile is pretty straight-forward. It will fetch the Bitwarden CLI from the official releases on GitHub at the specified version, install it into the image, copy in the entrypoint script, and make it executable. #!/bin/bash set -e bw config server ${BW_HOST} bw login --apikey export BW_SESSION=$(bw unlock ${BW_PASSWORD} --raw) bw unlock --check echo 'Running `bw server` on port 8087' bw serve --hostname 0.0.0.0 The entry point script will: Configure the server with the host specified in the BW_HOST environment variable. If unset, it will default to the host for the Bitwarden SaaS offering. Authenticate the bw CLI using the API key specified in the environment variables. We’ll come back to this in a moment. Unlock the vault using the master password. Then, it spins up the local webserver using bw serve. Security Oh yes, you read that correctly; the entry point script requires the master password for the Bitwarden account to function. In this case, it is stored in a Kubernetes Secret, which left me nervous about the solution. If a threat actor got access to the Kubernetes cluster and permissions to read secrets in the external-secrets namespace, they would gain access to the master password. Of course, this is unlikely given that the cluster is in a private network, behind the authentication and authorization of the Kubernetes api-server. If they have already achieved that level of access, they could hit the Bitwarden webhook to access the secrets anyway. Using a NetworkPolicy to limit ingress traffic to only the external-secrets pods, I can mitigate that problem. kind: NetworkPolicy apiVersion: networking.k8s.io/v1 metadata: name: external-secret-2-bw-cli spec: podSelector: matchLabels: app.kubernetes.io/instance: bitwarden-cli app.kubernetes.io/name: bitwarden-cli ingress: - from: - podSelector: matchLabels: app.kubernetes.io/instance: external-secrets app.kubernetes.io/name: external-secrets But, still, it made me uncomfortable. Having the master password to my personal Bitwarden account in my Kubernetes cluster, where I run services that are exposed to the open internet, is not something I was willing to do. However, I found a rather elegant compromise that worked out better overall. Account Setup I’m already subscribed to the Bitwarden Families plan, which, for $3.33 per month, includes up to 6 users, of which I was using 2. The family plan is fantastic because you get access the organization feature to share password entries between users. In each organization, you can have collections of passwords with fine-grained permission control. I’m sure you can see where I’m going with this; I created a Bitwarden user dedicated to the Kubernetes cluster. I added it to my organization, which gave it a premium subscription at no cost. Then, I created a collection in the organization dedicated to the cluster and gave that account read-only access. With this setup, I can create an entry in the collection from my primary personal Bitwarden account. And external-secrets in my Kubernetes cluster can retrieve values from that entry to populate Secrets used by services in the cluster. Kubernetes Configuration I’m a big fan of kustomize+helm, I think it’s the perfect combination of templating and last mile patching. But that’s a topic for another blog post. I use this combination for the deployment of external-secrets and the bitwarden-cli container I covered earlier. apiVersion: kustomize.config.k8s.io/v1beta1 kind: Kustomization namespace: external-secrets-system resources: - bitwarden-cli-deploy.yaml - secret-stores.yaml helmCharts: - name: external-secrets includeCRDs: true version: 0.9.0 repo: https://charts.external-secrets.io releaseName: external-secrets namespace: external-secrets-system valuesInline: resources: requests: cpu: 100m memory: 256Mi images: - name: ghcr.io/morey-tech/bitwarden-cli newTag: v0.2.0 This kustomization.yaml will deploy: The external-secrets Helm chart to the external-secrets-system namespace. The -system suffix is specific to my environment. A Deployment, Service, and NetworkPolicy (as covered earlier) for the bitwarden-cli container with the tag v0.2.0. Three ClusterSecretStore resources that use the webhook provider to configure External Secrets to use the bitwarden-cli deployment. One of them is used to retrieve the standard username and password property, one is used to retrieve custom field properties, and the other is used to retrieve the note property. Each of these is a separate JSON path on the webhook, which is why they are separate secret stores. All of which can be committed into Git and deployed by Argo CD. apiVersion: argoproj.io/v1alpha1 kind: Application metadata: name: external-secrets namespace: argocd spec: destination: namespace: external-secrets-system server: 'https://kubernetes.default.svc' project: default source: path: environments/rubrik/system/external-secrets repoURL: 'https://github.com/morey-tech/homelab.git' targetRevision: HEAD syncPolicy: automated: prune: true selfHeal: true syncOptions: - allowEmpty=true - CreateNamespace=true What can’t be committed into the Git repository, is the Secret used by the bitwarden-cli Deployment to authenticate and unseal the Bitwarden vault. This is one of two manual bootstrapping steps that I have yet to automate. But it looks like this: apiVersion: v1 kind: Secret metadata: name: bitwarden-cli namepsace: external-secrets-system type: Opaque data: # The master password for the account. BW_PASSWORD: # https://bitwarden.com/help/personal-api-key/ BW_CLIENTID: BW_CLIENTSECRET: Bring It All Together This diagram brings it all together to show the full flow from when an ExternalSecret is created to editing secrets with my personal Bitwarden User: Usage With External Secrets deployed with the Bitwarden CLI alongside it, I am ready to populate Secrets in my cluster with values from password entires in my Bitwarden vault (specifically the collection in my organization). Using the ExternalSecret resource, I can define what the generated Secret should look like: apiVersion: external-secrets.io/v1beta1 kind: ExternalSecret metadata: name: example-secret spec: target: name: example-secret deletionPolicy: Delete template: type: Opaque data: username: |- {{ .user }} password: |- {{ .pass }} testKey: |- {{ .testKey }} The keys in the double brackets ({{ .key }}) are references to the data section, which is where I defined which Bitwarden entry to take values from. spec: # ... data: - secretKey: user sourceRef: storeRef: name: bitwarden-login kind: ClusterSecretStore remoteRef: key: f98dbd25-e105-4555-c026-d121910ac03f property: username In this example, using the bitwarden-login ClusterSecretStore, the {{ .user }} key is populated with the username property from the Bitwarden vault entry with the ID used in the remoteRef.key. Unfortunately, I can not find a way to retrieve the ID of an entry from the browser extension (though not surprising). So, to get this value, I have to log into the Bitwarden web vault, view the desired entry, and copy it from the itemId= attribute in the URL. https://vault.bitwarden.com/#/vault?itemId=f98dbd25-e105-4555-c026-d121910ac03f Thankfully, because I’m using a separate Bitwarden account for External Secrets, I can keep that master password for it in my personal Bitwarden, making logging into the web vault a breeze. And, once I have that ID, I can paste it into the Bitwarden browser extension logged into my personal account to pull up the entry used in the ExternalSecret. Conclusion I wouldn’t recommend this approach for any significant production workload. Frankly, I may even out grow this solution and need to transition to proper secrets manager (e.g. one from Bitwarden or Google) in the future. But for a single cluster in a homelab environment where you are already a Bitwarden user, it’s a super efficient secrets management solution.]]></summary></entry><entry><title type="html">It’s like Magic - MetalLB, pfSense, and BGP</title><link href="https://morey.tech/technical%20blog/MetalLB-pfSense-and-BGP/" rel="alternate" type="text/html" title="It’s like Magic - MetalLB, pfSense, and BGP" /><published>2024-01-26T19:00:00-05:00</published><updated>2024-01-26T19:00:00-05:00</updated><id>https://morey.tech/technical%20blog/MetalLB-pfSense-and-BGP</id><content type="html" xml:base="https://morey.tech/technical%20blog/MetalLB-pfSense-and-BGP/"><![CDATA[<p><a href="https://kubernetes.io/docs/tasks/access-application-cluster/create-external-load-balancer/">Services in Kubernetes</a> can be exposed via a load balancer with an external IP address when given the <code class="language-plaintext highlighter-rouge">type: LoadBalancer</code>. When using an IaaS platform (e.g. AWS, GCP, DigitalOcean, Civo), they provide the load balancer implementation, typically using a controller in the cluster that creates the resource outside of the cluster (e.g. <a href="https://github.com/kubernetes-sigs/aws-load-balancer-controller">aws-load-balancer-controller</a>).</p>

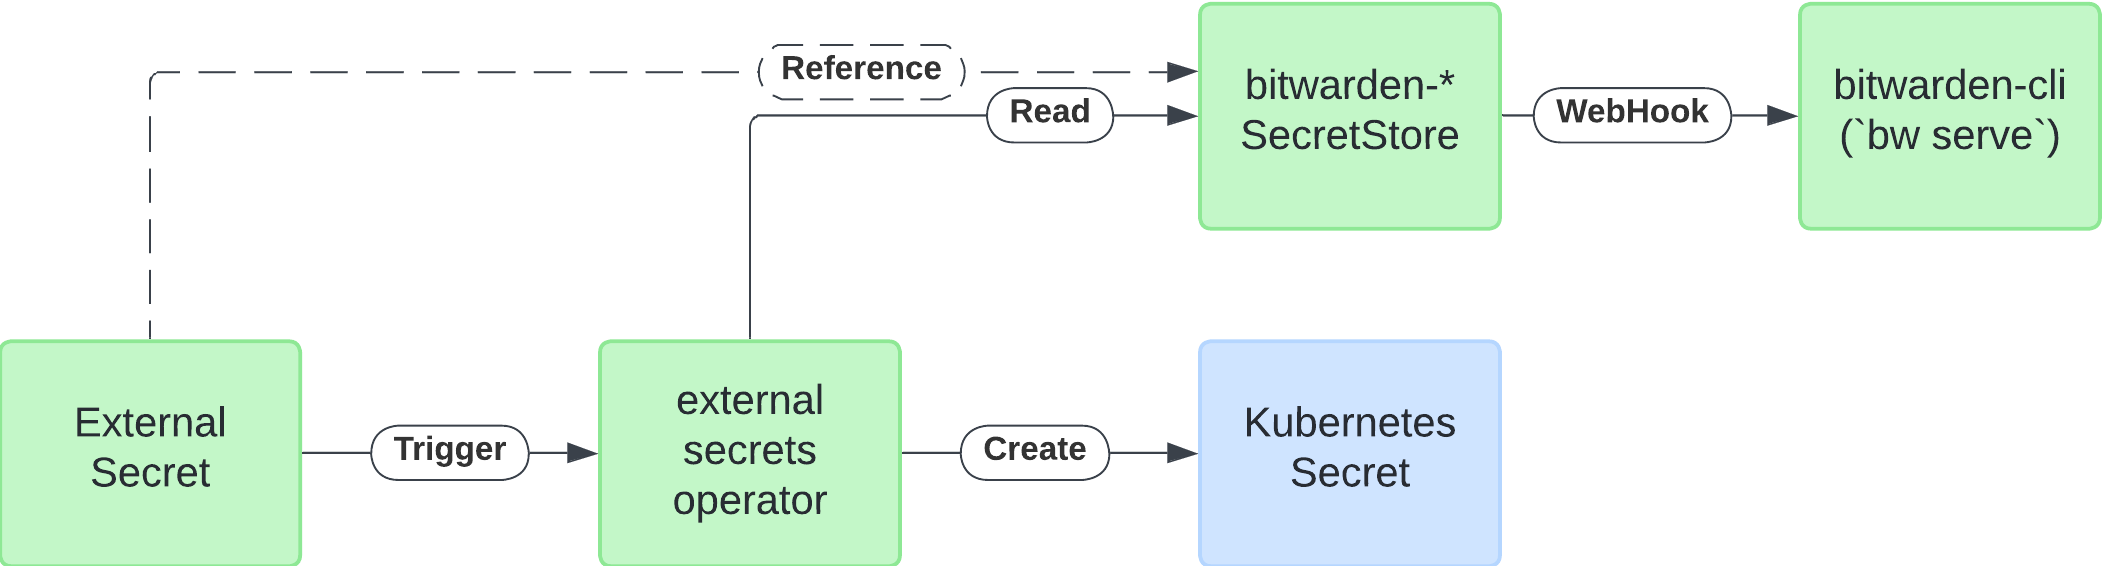


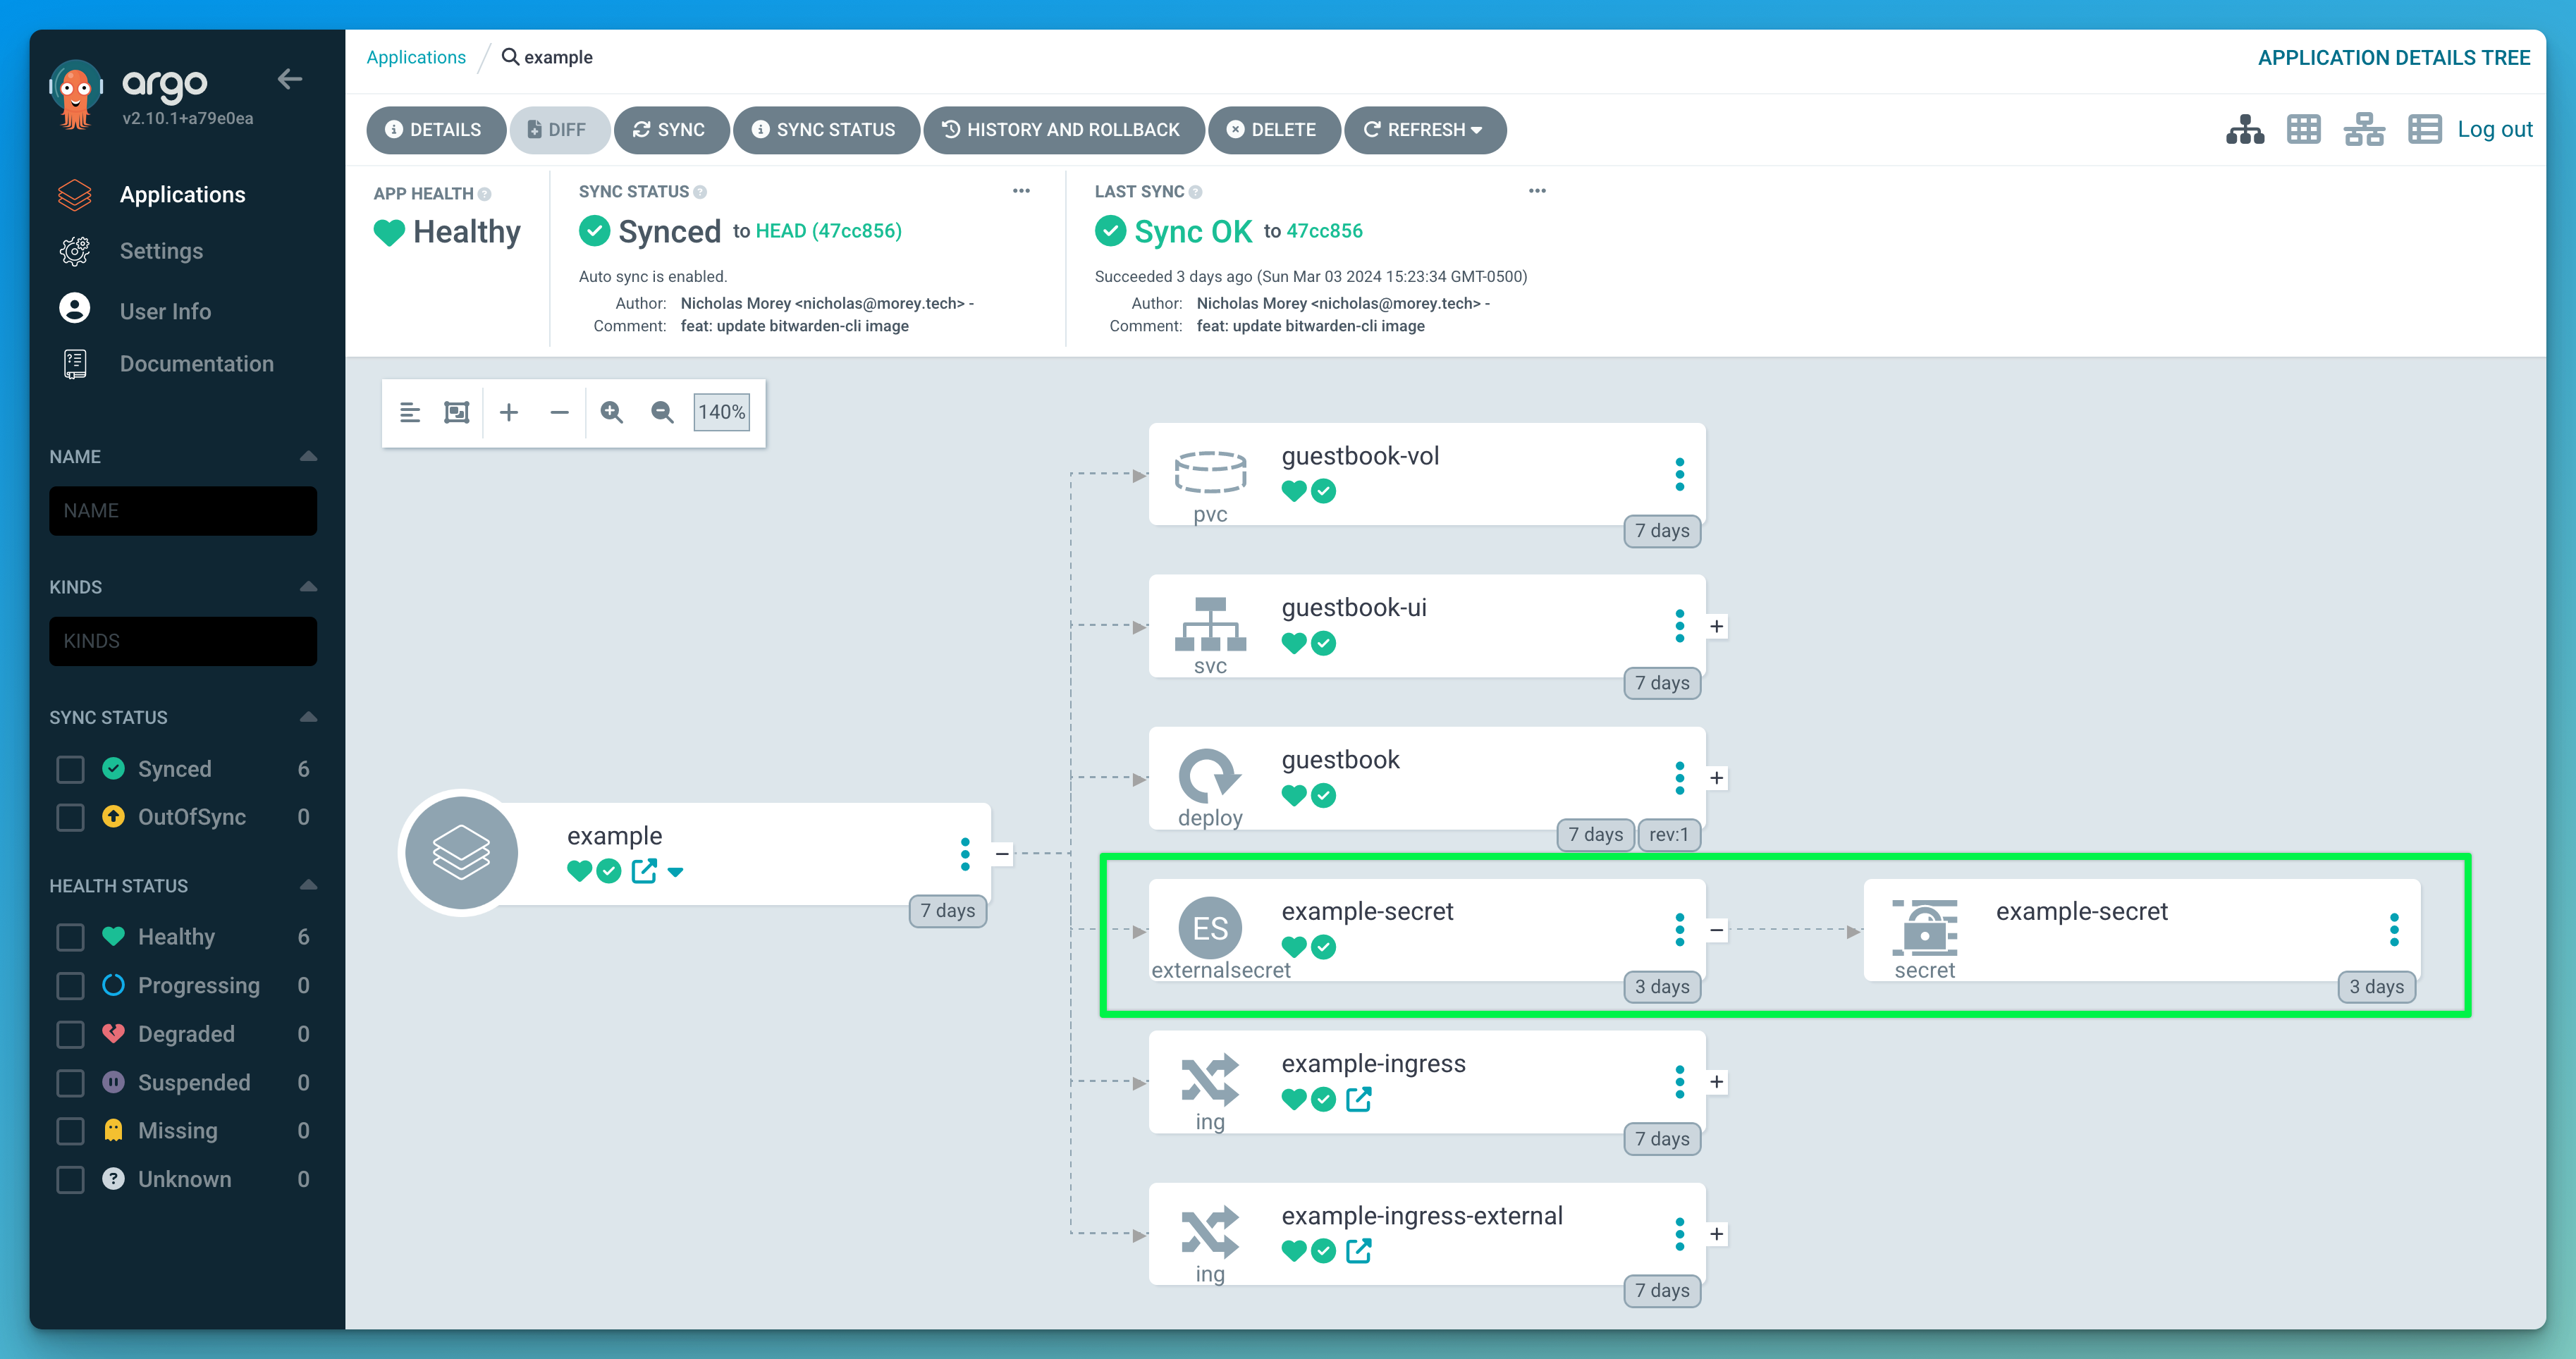
<p>However, Kubernetes does not implement network load balancers for bare-metal clusters. So you are left with “NodePort” services to route traffic into the clusters, which is insufficient for production use.</p>

<p>MetalLB offers a network load balancer implementation that integrates with standard network equipment (e.g. pfSense) so that external services on bare-metal clusters “just work”. Combined with <a href="https://pfsense.org/">pfSense</a> and <a href="https://www.cloudflare.com/en-ca/learning/security/glossary/what-is-bgp/">BGP</a>, it becomes like magic. Especially to me, who has a solid understanding of networking principles but not so much of complex routing.</p>

<p>Each time a Service is configured to receive an external IP address (external to the cluster network, not necessarily exposed to the internet) from MetalLB, it will be immediately (within milliseconds) known by pfSense and accessible to the rest of the network.</p>

<p><img src="/assets/images/MetalLB-PfSense-BGP-diagram.png" alt="MetalLB-PfSense-BGP-diagram" /></p>

<h2 id="the-setup">The Setup</h2>

<h3 id="prerequisites">Prerequisites</h3>

<p>I’ll assume that pfSense is already installed and configured with the bare minimum configuration. Basically, pfSense should be the router for the LAN network that the Kubernetes nodes are connected to. And that you have a (bare-metal) Kubernetes cluster with <a href="https://metallb.universe.tf/installation/network-addons/">a CNI compatible with MetalLB</a>.</p>

<h3 id="my-environment">My Environment</h3>

<p>In my case, I have a bare-metal Kubernetes cluster comprised of 3 nodes, running MicroK8s with Calico as the CNI. With pfSense running in a VM under Proxmox, hosted on a bare-metal host dedicated to networking services, acting as the network’s primary router (and default gateway).</p>

<p>I’ll reference the following attributes in the configuration throughout the setup steps.</p>

<table>
  <thead>
    <tr>
      <th>Attribute</th>
      <th>Value</th>
    </tr>
  </thead>
  <tbody>
    <tr>
      <td>VRF Name</td>
      <td>default</td>
    </tr>
    <tr>
      <td>pfSense ASN</td>
      <td>65100</td>
    </tr>
    <tr>
      <td>pfSense Router ID</td>
      <td>192.168.3.1</td>
    </tr>
    <tr>
      <td>BGP network</td>
      <td>10.8.0.0/16</td>
    </tr>
    <tr>
      <td>MetalLB ASN</td>
      <td>65101</td>
    </tr>
    <tr>
      <td>Neighbor IP Addresses</td>
      <td>192.168.3.15<br />192.168.3.16<br />192.168.3.17<br />192.168.3.18</td>
    </tr>
  </tbody>
</table>

<h3 id="pfsense">pfSense</h3>

<p>pfSense implements BGP using <a href="https://frrouting.org">the (FRR) project</a>, which is a free and open-source Internet routing protocol suite for Linux. It implements not only BGP but also OSPF, RIP, IS-IS, PIM, LDP, BFD, Babel, PBR, OpenFabric and VRRP, with alpha support for EIGRP and NHRP.</p>

<ul>
  <li>Install the FRR package on pfSense.
    <ul>
      <li>Go to “System / Package Manager / Available Packages”.</li>
      <li>Search for the package “frr.”</li>
      <li>Click “+ Install”.</li>
    </ul>

    <p><img src="/assets/images/Xnapper-2024-01-27-15.10.13.png" alt="Xnapper-2024-01-27-15.10.13.png" /></p>

    <p><img src="/assets/images/Xnapper-2024-01-27-15.11.18.png" alt="Xnapper-2024-01-27-15.11.18.png" /></p>
  </li>
  <li>Enable the FRR service.
    <ul>
      <li>Go to “Services / FRR / Global Settings”.</li>
      <li>Click the “Enable FRR” checkbox.</li>
      <li>Enter a “Master Password” (this can be generated and isn’t used later).</li>
      <li>Click “Save” at the bottom of the page.</li>
    </ul>

    <p><img src="/assets/images/Xnapper-2024-01-27-11.41.28.png" alt="Xnapper-2024-01-27-11.41.28.png" /></p>
  </li>
  <li>Add a Route Map to tell pfSense to accept any routes being sent to it from other routers.
    <ul>
      <li>Go to “Services / FRR / Global Settings”.</li>
      <li>Set the “Name” to “Permit-Any”.</li>
      <li>Set the “Description to “Match any route”.</li>
      <li>Set the “Action” to “Permit”.</li>
      <li>Set the “Sequence” to “100”.</li>
      <li>Click “Save” at the bottom of the page.</li>
    </ul>

    <p><img src="/assets/images/Xnapper-2024-01-27-14.51.21.png" alt="Xnapper-2024-01-27-14.51.21.png" /></p>
  </li>
  <li>Enable BGP and set the ASN.
    <ul>
      <li>Go to “Services / FRR / BGP / BGP”.</li>
      <li>Click the “Enable BGP Routing” checkbox.</li>
      <li>Set the “Local AS” to a valid private AS number for pfSense (e.g. <code class="language-plaintext highlighter-rouge">64500</code>).</li>
      <li>Set the “Router ID” to the gateway IP assigned to pfSense on the LAN network for the Kubernetes nodes (e.g. <code class="language-plaintext highlighter-rouge">192.168.3.1</code>).</li>
      <li>Click “Save” at the bottom of the page.</li>
    </ul>

    <p><img src="/assets/images/Xnapper-2024-01-27-13.09.53.png" alt="Xnapper-2024-01-27-13.09.53.png" /></p>

    <ul>
      <li>Under “Advanced”, check the box for “Disable eBGP Require Policy”.
        <ul>
          <li>Normally, eBGP requires filter policies to configure trust when ISPs need to peer with other ISPs. This doesn’t have to be disabled, but then you would need to configure a policy to allow the routes.</li>
          <li>Click “Save” at the bottom of the page.</li>
        </ul>

        <p><img src="/assets/images/Xnapper-2024-01-27-13.17.04.png" alt="Xnapper-2024-01-27-13.17.04.png" /></p>
      </li>
    </ul>
  </li>
  <li>Set up the BGP neighbours (Kubernetes nodes) in a peer group.
    <ul>
      <li>Go to “Services / FRR / BGP / Edit / Neighbors”.</li>
      <li>Create top-level neighbour that will become the peer group.
        <ul>
          <li>Set the “Name/Address” for the group (e.g. “rubrik-metallb).</li>
          <li>Set the “Description” to what the peer group will contain.</li>
          <li>Set the “Remote AS” to the desired ASN for MetalLB (e.g. “64501”).</li>
          <li>Click “Save” at the bottom of the page.</li>
        </ul>

        <p><img src="/assets/images/Xnapper-2024-01-27-14.39.19.png" alt="Xnapper-2024-01-27-14.39.19.png" /></p>
      </li>
      <li>Then create a neighbor for each Kubernetes node that MetalLB is running on.
        <ul>
          <li>Set the “Name/Address” to the IP address of the Kubernetes worker node.</li>
          <li>Set the “Description” to the hostname of the node.</li>
          <li>Set the “Peer Group” to the top-level neighbor (“rubrik-metallb” in my case).</li>
          <li>Set the “Remote AS” to the desired ASN for MetalLB (e.g. “64501”).</li>
          <li>Click “Save” at the bottom of the page.</li>
        </ul>

        <p><img src="/assets/images/Xnapper-2024-01-27-14.50.17.png" alt="Xnapper-2024-01-27-14.50.17.png" /></p>
      </li>
    </ul>
  </li>
</ul>

<h3 id="metallb-kubernetes">MetalLB (Kubernetes)</h3>

<ul>
  <li>Install MetalLB onto your Kubernetes cluster.
    <ul>
      <li>You can find the complete installation instructions here: <a href="https://metallb.universe.tf/installation/">https://metallb.universe.tf/installation/</a></li>
      <li>In my environment, I’m using Kustomize to reference the manifests from the MetalLB repo. And Argo CD to deploy the manifests into the cluster from Git.</li>
      <li>
        <p>The Argo CD Application looks like:</p>

        <div class="language-jsx highlighter-rouge"><div class="highlight"><pre class="highlight"><code>  <span class="nx">apiVersion</span><span class="p">:</span> <span class="nx">argoproj</span><span class="p">.</span><span class="nx">io</span><span class="o">/</span><span class="nx">v1alpha1</span>
  <span class="nx">kind</span><span class="p">:</span> <span class="nx">Application</span>
  <span class="nx">metadata</span><span class="p">:</span>
    <span class="nx">name</span><span class="p">:</span> <span class="nx">metallb</span>
    <span class="nx">namespace</span><span class="p">:</span> <span class="nx">argocd</span>
  <span class="nx">spec</span><span class="p">:</span>
    <span class="nx">project</span><span class="p">:</span> <span class="k">default</span>
    <span class="nx">source</span><span class="p">:</span>
      <span class="nx">path</span><span class="p">:</span> <span class="nx">environments</span><span class="o">/</span><span class="nx">rubrik</span><span class="o">/</span><span class="nx">system</span><span class="o">/</span><span class="nx">metallb</span>
      <span class="nx">repoURL</span><span class="p">:</span> <span class="dl">'</span><span class="s1">https://github.com/morey-tech/homelab.git</span><span class="dl">'</span>
      <span class="nx">targetRevision</span><span class="p">:</span> <span class="nx">HEAD</span>
    <span class="nx">destination</span><span class="p">:</span>
      <span class="nx">namespace</span><span class="p">:</span> <span class="nx">metallb</span><span class="o">-</span><span class="nx">system</span>
      <span class="nx">server</span><span class="p">:</span> <span class="dl">'</span><span class="s1">https://kubernetes.default.svc</span><span class="dl">'</span>
    <span class="nx">ignoreDifferences</span><span class="p">:</span>
      <span class="o">-</span> <span class="nx">group</span><span class="p">:</span> <span class="nx">apiextensions</span><span class="p">.</span><span class="nx">k8s</span><span class="p">.</span><span class="nx">io</span>
        <span class="nx">jsonPointers</span><span class="p">:</span>
          <span class="o">-</span> <span class="sr">/spec/</span><span class="nx">conversion</span><span class="o">/</span><span class="nx">webhook</span><span class="o">/</span><span class="nx">clientConfig</span><span class="o">/</span><span class="nx">caBundle</span>
        <span class="nx">kind</span><span class="p">:</span> <span class="nx">CustomResourceDefinition</span>
    <span class="nx">syncPolicy</span><span class="p">:</span>
      <span class="nx">automated</span><span class="p">:</span> <span class="p">{}</span>
      <span class="nl">syncOptions</span><span class="p">:</span>
        <span class="o">-</span> <span class="nx">allowEmpty</span><span class="o">=</span><span class="kc">true</span>
        <span class="o">-</span> <span class="nx">CreateNamespace</span><span class="o">=</span><span class="kc">true</span>
</code></pre></div>        </div>
      </li>
      <li>
        <p>The <code class="language-plaintext highlighter-rouge">kustomization.yaml</code> referenced by the Application, at <code class="language-plaintext highlighter-rouge">environments/rubrik/system/metallb</code> in my <code class="language-plaintext highlighter-rouge">morey-tech/homelab</code> repo, looks like:</p>

        <div class="language-jsx highlighter-rouge"><div class="highlight"><pre class="highlight"><code>  <span class="nx">namespace</span><span class="p">:</span> <span class="nx">metallb</span><span class="o">-</span><span class="nx">system</span>
  <span class="nx">resources</span><span class="p">:</span>
    <span class="o">-</span> <span class="nx">github</span><span class="p">.</span><span class="nx">com</span><span class="o">/</span><span class="nx">metallb</span><span class="o">/</span><span class="nx">metallb</span><span class="o">/</span><span class="nx">config</span><span class="o">/</span><span class="nx">native</span><span class="p">?</span><span class="nx">ref</span><span class="o">=</span><span class="nx">v0</span><span class="p">.</span><span class="mf">13.12</span>
    <span class="o">-</span> <span class="nx">config</span><span class="p">.</span><span class="nx">yaml</span>
</code></pre></div>        </div>

        <ul>
          <li>It installs version <code class="language-plaintext highlighter-rouge">v0.13.12</code> of MetalLB.</li>
          <li><code class="language-plaintext highlighter-rouge">config.yaml</code> contains the configuration for MetalLB which I’ll cover next.</li>
        </ul>
      </li>
    </ul>
  </li>
  <li>Configure MetalLB to advertise the address pool and peer with pfSense.
    <ul>
      <li>Define the IP address pool.
        <ul>
          <li>The <code class="language-plaintext highlighter-rouge">addresses</code> can be any non-overlapping subnet and doesn’t have to be related at all to existing subnets. Thanks to the magic of BGP, pfSense will automatically know how to route requests for IP addresses in this subnet to the Kubernetes nodes.</li>
        </ul>

        <div class="language-yaml highlighter-rouge"><div class="highlight"><pre class="highlight"><code>  <span class="na">apiVersion</span><span class="pi">:</span> <span class="s">metallb.io/v1beta1</span>
  <span class="na">kind</span><span class="pi">:</span> <span class="s">IPAddressPool</span>
  <span class="na">metadata</span><span class="pi">:</span>
    <span class="na">name</span><span class="pi">:</span> <span class="s">rubrik-address-pool</span>
    <span class="na">namespace</span><span class="pi">:</span> <span class="s">metallb-system</span>
  <span class="na">spec</span><span class="pi">:</span>
    <span class="na">addresses</span><span class="pi">:</span>
    <span class="pi">-</span> <span class="s">10.8.0.0/16</span>
</code></pre></div>        </div>
      </li>
      <li>
        <p>Define the BGP advertisement for the IP address pool.</p>

        <div class="language-yaml highlighter-rouge"><div class="highlight"><pre class="highlight"><code>  <span class="na">apiVersion</span><span class="pi">:</span> <span class="s">metallb.io/v1beta1</span>
  <span class="na">kind</span><span class="pi">:</span> <span class="s">BGPAdvertisement</span>
  <span class="na">metadata</span><span class="pi">:</span>
    <span class="na">name</span><span class="pi">:</span> <span class="s">bgp-advertisement</span>
  <span class="na">spec</span><span class="pi">:</span>
    <span class="na">ipAddressPools</span><span class="pi">:</span>
    <span class="pi">-</span> <span class="s">rubrik-address-pool</span>
    <span class="c1"># Advertise each route as a /32 (i.e. single IP address).</span>
    <span class="na">aggregationLength</span><span class="pi">:</span> <span class="m">32</span>
</code></pre></div>        </div>
      </li>
      <li>Configure MetalLB to peer with pfSense.
        <ul>
          <li>Set <code class="language-plaintext highlighter-rouge">myASN</code> to the ASN of the MetalLB (e.g. <code class="language-plaintext highlighter-rouge">64501</code>).</li>
          <li>Set <code class="language-plaintext highlighter-rouge">peerASN</code> to the ASN of pfSense (e.g. <code class="language-plaintext highlighter-rouge">64500</code>).</li>
          <li>Set the <code class="language-plaintext highlighter-rouge">peerAddress</code> to the “Router ID” used in pfSense (e.g. the gateway IP on the lan network for the Kubernetes nodes).</li>
        </ul>

        <div class="language-yaml highlighter-rouge"><div class="highlight"><pre class="highlight"><code>  <span class="na">apiVersion</span><span class="pi">:</span> <span class="s">metallb.io/v1beta2</span>
  <span class="na">kind</span><span class="pi">:</span> <span class="s">BGPPeer</span>
  <span class="na">metadata</span><span class="pi">:</span>
    <span class="na">name</span><span class="pi">:</span> <span class="s">pfsense-peer</span>
  <span class="na">spec</span><span class="pi">:</span>
    <span class="na">myASN</span><span class="pi">:</span> <span class="m">64501</span>
    <span class="c1"># ASN of pfSense.</span>
    <span class="na">peerASN</span><span class="pi">:</span> <span class="m">64500</span>
    <span class="na">peerAddress</span><span class="pi">:</span> <span class="s">192.168.3.1</span>
</code></pre></div>        </div>
      </li>
    </ul>
  </li>
</ul>

<h2 id="put-it-to-the-test">Put it to the test</h2>

<ul>
  <li>Create a Service for MetalLB to assign an IP address to from the pool.
    <ul>
      <li>The <code class="language-plaintext highlighter-rouge">metallb.universe.tf/address-pool</code> annotation is how MetalLB knows to assign an IP address and from what pool.</li>
    </ul>

    <div class="language-yaml highlighter-rouge"><div class="highlight"><pre class="highlight"><code>  <span class="na">apiVersion</span><span class="pi">:</span> <span class="s">v1</span>
  <span class="na">kind</span><span class="pi">:</span> <span class="s">Service</span>
  <span class="na">metadata</span><span class="pi">:</span>
    <span class="na">name</span><span class="pi">:</span> <span class="s">guestbook-ui</span>
    <span class="na">namespace</span><span class="pi">:</span> <span class="s">example</span>
    <span class="na">annotations</span><span class="pi">:</span>
      <span class="na">metallb.universe.tf/address-pool</span><span class="pi">:</span> <span class="s">rubrik-address-pool</span>
  <span class="na">spec</span><span class="pi">:</span>
    <span class="na">type</span><span class="pi">:</span> <span class="s">LoadBalancer</span>
    <span class="na">ports</span><span class="pi">:</span>
    <span class="pi">-</span> <span class="na">port</span><span class="pi">:</span> <span class="m">80</span>
      <span class="na">targetPort</span><span class="pi">:</span> <span class="m">80</span>
    <span class="na">selector</span><span class="pi">:</span>
      <span class="na">app</span><span class="pi">:</span> <span class="s">guestbook-ui</span>
</code></pre></div>    </div>
  </li>
  <li>
    <p>Once created, the status will update with the IP address assigned by MetalLB</p>

    <div class="language-yaml highlighter-rouge"><div class="highlight"><pre class="highlight"><code>  <span class="na">status</span><span class="pi">:</span>
    <span class="na">loadBalancer</span><span class="pi">:</span>
      <span class="na">ingress</span><span class="pi">:</span>
        <span class="pi">-</span> <span class="na">ip</span><span class="pi">:</span> <span class="s">10.8.0.0</span>
</code></pre></div>    </div>
  </li>
  <li>Back in pfSense you can check the routes created for the service.
    <ul>
      <li>Go to “Services / FRR / Status / BGP”.</li>
      <li>Under “BGP Routes” it’ll show the IP address for the service and the IP addresses of the Kubernetes advertising that service IP.</li>
    </ul>

    <p><img src="/assets/images/Xnapper-2024-01-27-15.46.35.png" alt="Xnapper-2024-01-27-15.46.35.png" /></p>
  </li>
</ul>

<h2 id="conclusion">Conclusion</h2>

<p>It’s now dead simple to get a routable IP address for any service in my bare-metal Kubernetes cluster. By simply adding the annotation to a Service of <code class="language-plaintext highlighter-rouge">type: LoadBalancer</code>, MetalLB will assign an IP address from the pool and advertise it using BGP to pfSense. At which point, I can reach the service from outside of the cluster, anywhere else on the network.</p>

<p><img src="/assets/images/Xnapper-2024-01-27-16.37.24.png" alt="Xnapper-2024-01-27-16.37.24.png" /></p>

<p>Referencing IP addresses when trying to access services from Kubernetes is not very user friendly, and not very tolerant to the dynamic nature of the IP assignments. My next step is to automated the create of DNS records for these services using a combination of <a href="https://github.com/kubernetes-sigs/external-dns"><code class="language-plaintext highlighter-rouge">external-dns</code></a> and <a href="https://github.com/ori-edge/k8s_gateway"><code class="language-plaintext highlighter-rouge">k8s_gateway</code></a> to resolve external IPs from outside of Kubernetes.</p>

<h1 id="references">References</h1>

<ul>
  <li><a href="https://github.com/noahburrell0/k8s/blob/main/configs/setup/metallb/configs.yaml">noahburrell0/k8s - configs/setup/metallb/configs.yaml</a></li>
  <li><a href="https://docs.netgate.com/tnsr/en/latest/dynamicrouting/bgp/required-info.html">docs.netgate.com - BGP Required Information</a></li>
  <li><a href="https://www.youtube.com/watch?v=jXG8fuJ-fUI">Youtube - Basic BGP Configuration on pfSense </a></li>
  <li><a href="https://blog.perf3ct.tech/setting-up-metallb-in-bgp-mode-with-pfsense/">perf3ct.tech - Setting up MetalLB in BGP mode with pfSense</a></li>
  <li><a href="https://metallb.universe.tf/">MetalLB Docs</a></li>
</ul>]]></content><author><name>Nicholas Morey</name></author><category term="Technical Blog" /><category term="homelab" /><category term="maas" /><category term="bare-metal" /><category term="kubernetes" /><summary type="html"><![CDATA[Services in Kubernetes can be exposed via a load balancer with an external IP address when given the type: LoadBalancer. When using an IaaS platform (e.g. AWS, GCP, DigitalOcean, Civo), they provide the load balancer implementation, typically using a controller in the cluster that creates the resource outside of the cluster (e.g. aws-load-balancer-controller). However, Kubernetes does not implement network load balancers for bare-metal clusters. So you are left with “NodePort” services to route traffic into the clusters, which is insufficient for production use. MetalLB offers a network load balancer implementation that integrates with standard network equipment (e.g. pfSense) so that external services on bare-metal clusters “just work”. Combined with pfSense and BGP, it becomes like magic. Especially to me, who has a solid understanding of networking principles but not so much of complex routing. Each time a Service is configured to receive an external IP address (external to the cluster network, not necessarily exposed to the internet) from MetalLB, it will be immediately (within milliseconds) known by pfSense and accessible to the rest of the network. The Setup Prerequisites I’ll assume that pfSense is already installed and configured with the bare minimum configuration. Basically, pfSense should be the router for the LAN network that the Kubernetes nodes are connected to. And that you have a (bare-metal) Kubernetes cluster with a CNI compatible with MetalLB. My Environment In my case, I have a bare-metal Kubernetes cluster comprised of 3 nodes, running MicroK8s with Calico as the CNI. With pfSense running in a VM under Proxmox, hosted on a bare-metal host dedicated to networking services, acting as the network’s primary router (and default gateway). I’ll reference the following attributes in the configuration throughout the setup steps. Attribute Value VRF Name default pfSense ASN 65100 pfSense Router ID 192.168.3.1 BGP network 10.8.0.0/16 MetalLB ASN 65101 Neighbor IP Addresses 192.168.3.15192.168.3.16192.168.3.17192.168.3.18 pfSense pfSense implements BGP using the (FRR) project, which is a free and open-source Internet routing protocol suite for Linux. It implements not only BGP but also OSPF, RIP, IS-IS, PIM, LDP, BFD, Babel, PBR, OpenFabric and VRRP, with alpha support for EIGRP and NHRP. Install the FRR package on pfSense. Go to “System / Package Manager / Available Packages”. Search for the package “frr.” Click “+ Install”. Enable the FRR service. Go to “Services / FRR / Global Settings”. Click the “Enable FRR” checkbox. Enter a “Master Password” (this can be generated and isn’t used later). Click “Save” at the bottom of the page. Add a Route Map to tell pfSense to accept any routes being sent to it from other routers. Go to “Services / FRR / Global Settings”. Set the “Name” to “Permit-Any”. Set the “Description to “Match any route”. Set the “Action” to “Permit”. Set the “Sequence” to “100”. Click “Save” at the bottom of the page. Enable BGP and set the ASN. Go to “Services / FRR / BGP / BGP”. Click the “Enable BGP Routing” checkbox. Set the “Local AS” to a valid private AS number for pfSense (e.g. 64500). Set the “Router ID” to the gateway IP assigned to pfSense on the LAN network for the Kubernetes nodes (e.g. 192.168.3.1). Click “Save” at the bottom of the page. Under “Advanced”, check the box for “Disable eBGP Require Policy”. Normally, eBGP requires filter policies to configure trust when ISPs need to peer with other ISPs. This doesn’t have to be disabled, but then you would need to configure a policy to allow the routes. Click “Save” at the bottom of the page. Set up the BGP neighbours (Kubernetes nodes) in a peer group. Go to “Services / FRR / BGP / Edit / Neighbors”. Create top-level neighbour that will become the peer group. Set the “Name/Address” for the group (e.g. “rubrik-metallb). Set the “Description” to what the peer group will contain. Set the “Remote AS” to the desired ASN for MetalLB (e.g. “64501”). Click “Save” at the bottom of the page. Then create a neighbor for each Kubernetes node that MetalLB is running on. Set the “Name/Address” to the IP address of the Kubernetes worker node. Set the “Description” to the hostname of the node. Set the “Peer Group” to the top-level neighbor (“rubrik-metallb” in my case). Set the “Remote AS” to the desired ASN for MetalLB (e.g. “64501”). Click “Save” at the bottom of the page. MetalLB (Kubernetes) Install MetalLB onto your Kubernetes cluster. You can find the complete installation instructions here: https://metallb.universe.tf/installation/ In my environment, I’m using Kustomize to reference the manifests from the MetalLB repo. And Argo CD to deploy the manifests into the cluster from Git. The Argo CD Application looks like: apiVersion: argoproj.io/v1alpha1 kind: Application metadata: name: metallb namespace: argocd spec: project: default source: path: environments/rubrik/system/metallb repoURL: 'https://github.com/morey-tech/homelab.git' targetRevision: HEAD destination: namespace: metallb-system server: 'https://kubernetes.default.svc' ignoreDifferences: - group: apiextensions.k8s.io jsonPointers: - /spec/conversion/webhook/clientConfig/caBundle kind: CustomResourceDefinition syncPolicy: automated: {} syncOptions: - allowEmpty=true - CreateNamespace=true The kustomization.yaml referenced by the Application, at environments/rubrik/system/metallb in my morey-tech/homelab repo, looks like: namespace: metallb-system resources: - github.com/metallb/metallb/config/native?ref=v0.13.12 - config.yaml It installs version v0.13.12 of MetalLB. config.yaml contains the configuration for MetalLB which I’ll cover next. Configure MetalLB to advertise the address pool and peer with pfSense. Define the IP address pool. The addresses can be any non-overlapping subnet and doesn’t have to be related at all to existing subnets. Thanks to the magic of BGP, pfSense will automatically know how to route requests for IP addresses in this subnet to the Kubernetes nodes. apiVersion: metallb.io/v1beta1 kind: IPAddressPool metadata: name: rubrik-address-pool namespace: metallb-system spec: addresses: - 10.8.0.0/16 Define the BGP advertisement for the IP address pool. apiVersion: metallb.io/v1beta1 kind: BGPAdvertisement metadata: name: bgp-advertisement spec: ipAddressPools: - rubrik-address-pool # Advertise each route as a /32 (i.e. single IP address). aggregationLength: 32 Configure MetalLB to peer with pfSense. Set myASN to the ASN of the MetalLB (e.g. 64501). Set peerASN to the ASN of pfSense (e.g. 64500). Set the peerAddress to the “Router ID” used in pfSense (e.g. the gateway IP on the lan network for the Kubernetes nodes). apiVersion: metallb.io/v1beta2 kind: BGPPeer metadata: name: pfsense-peer spec: myASN: 64501 # ASN of pfSense. peerASN: 64500 peerAddress: 192.168.3.1 Put it to the test Create a Service for MetalLB to assign an IP address to from the pool. The metallb.universe.tf/address-pool annotation is how MetalLB knows to assign an IP address and from what pool. apiVersion: v1 kind: Service metadata: name: guestbook-ui namespace: example annotations: metallb.universe.tf/address-pool: rubrik-address-pool spec: type: LoadBalancer ports: - port: 80 targetPort: 80 selector: app: guestbook-ui Once created, the status will update with the IP address assigned by MetalLB status: loadBalancer: ingress: - ip: 10.8.0.0 Back in pfSense you can check the routes created for the service. Go to “Services / FRR / Status / BGP”. Under “BGP Routes” it’ll show the IP address for the service and the IP addresses of the Kubernetes advertising that service IP. Conclusion It’s now dead simple to get a routable IP address for any service in my bare-metal Kubernetes cluster. By simply adding the annotation to a Service of type: LoadBalancer, MetalLB will assign an IP address from the pool and advertise it using BGP to pfSense. At which point, I can reach the service from outside of the cluster, anywhere else on the network. Referencing IP addresses when trying to access services from Kubernetes is not very user friendly, and not very tolerant to the dynamic nature of the IP assignments. My next step is to automated the create of DNS records for these services using a combination of external-dns and k8s_gateway to resolve external IPs from outside of Kubernetes. References noahburrell0/k8s - configs/setup/metallb/configs.yaml docs.netgate.com - BGP Required Information Youtube - Basic BGP Configuration on pfSense perf3ct.tech - Setting up MetalLB in BGP mode with pfSense MetalLB Docs]]></summary></entry><entry><title type="html">24,000 Fabrics and Counting - Fixing MaaS Kubernetes Fabric Sprawl</title><link href="https://morey.tech/technical%20blog/24000-Fabrics-and-Counting/" rel="alternate" type="text/html" title="24,000 Fabrics and Counting - Fixing MaaS Kubernetes Fabric Sprawl" /><published>2024-01-12T19:00:00-05:00</published><updated>2024-01-12T19:00:00-05:00</updated><id>https://morey.tech/technical%20blog/24000-Fabrics-and-Counting</id><content type="html" xml:base="https://morey.tech/technical%20blog/24000-Fabrics-and-Counting/"><![CDATA[<p>On a snowy Saturday morning, I enter my office intending to test out-of-band ingress-nginx on <a href="https://microk8s.io/">MicroK8s</a>. I log into my desktop and open up the <a href="https://maas.io/">MaaS</a> dashboard to check the network configuration of my bare-metal Kubernetes nodes. When I open the page, my Fixfox window slows to a stall with spinning icons next to the fabrics.</p>

<p>I kept refreshing the page and opening it in new tabs, but the issue persisted. I checked the subnets page to see if that would load. I was expecting to see my standard subnets, and I did, but they were accompanied by nearly a 1,000 pages of generic <code class="language-plaintext highlighter-rouge">fabric-xxxxx</code> entries, over 24,000 of them.</p>

<p><img src="/assets/images/2024-01-13-09-59-01.png" alt="2024-01-13-09-59-01.png" /></p>

<p>In a discord call with me, as I was tearing out my hair, was Noah, who, after some brief searching, found <a href="https://discourse.maas.io/t/maas-3-2-9-creates-calico-interfaces-80-000-fabrics/7625/6">this thread on the MaaS forum</a>. Another user found that “<a href="https://maas.io/docs/machines#heading--about-updating-hardware">the [periodic] hardware sync</a> recognises Calico interfaces from the K8 cluster every 15 minutes and creates a fabric for each interface.” In my case, I have four physical hosts managed by MaaS with periodic sync enabled, where three of which are in a Kubernetes cluster running Microk8s.</p>

<p><img src="/assets/images/Xnapper-2024-01-13-14.00.31.png" alt="Xnapper-2024-01-13-14.00.31.png" /></p>

<p>The thread acknowledges that it may be a bug. However, the proposed <strong>workaround</strong> is to <strong>disable hardware sync</strong> for the hosts running Kubernetes and <strong>edit the database to remove the erroneous fabric entries</strong>. The problem is that once hardware sync is enabled on a host, it can’t be disabled from the UI without releasing and deploying it again. But, you can edit the database entries for the hosts on MaaS to disable it.</p>

<p>First, let’s connect to the <code class="language-plaintext highlighter-rouge">maasdb</code> as the <code class="language-plaintext highlighter-rouge">postgres</code> user.</p>

<div class="language-plaintext highlighter-rouge"><div class="highlight"><pre class="highlight"><code>sudo su postgres
psql
postgres-# \l
                                  List of databases
   Name    |  Owner   | Encoding |   Collate   |    Ctype    |   Access privileges   
-----------+----------+----------+-------------+-------------+-----------------------
 maasdb    | postgres | UTF8     | en_US.UTF-8 | en_US.UTF-8 |
postgres=# \c maasdb;
You are now connected to database "maasdb" as user "postgres".
</code></pre></div></div>

<p>Then select the hosts by <code class="language-plaintext highlighter-rouge">id</code> and <code class="language-plaintext highlighter-rouge">enable_hw_sync</code> from the <code class="language-plaintext highlighter-rouge">maasserver_node</code> table to see what the current status is.</p>

<div class="language-plaintext highlighter-rouge"><div class="highlight"><pre class="highlight"><code>maasdb=# select id,enable_hw_sync from maasserver_node;
 id | enable_hw_sync 
----+----------------
  1 | f
  2 | f
  7 | f
  5 | t
  6 | t
  8 | t
(6 rows)
</code></pre></div></div>

<p>In my case, I want to disable hardware sync (set <code class="language-plaintext highlighter-rouge">enable_hw_sync</code> to <code class="language-plaintext highlighter-rouge">false</code>) for all of my hosts, so I used an UPDATE statement for all records in <code class="language-plaintext highlighter-rouge">maasserver_node</code>.</p>

<div class="language-plaintext highlighter-rouge"><div class="highlight"><pre class="highlight"><code>maasdb=# UPDATE maasserver_node SET enable_hw_sync = false;
UPDATE 6
maasdb=# select id,enable_hw_sync from maasserver_node;
 id | enable_hw_sync 
----+----------------
  1 | f
  2 | f
  7 | f
  5 | f
  6 | f
  8 | f
(6 rows)
</code></pre></div></div>

<p>Turns out, there is also a systemd timer named <code class="language-plaintext highlighter-rouge">maas_hardware_sync</code> on each host to clean up. I found that out by watching the fabrics get added in real-time after I thought I had cleaned them up.</p>

<div class="language-plaintext highlighter-rouge"><div class="highlight"><pre class="highlight"><code>ubuntu@rubrik-c:~$ sudo systemctl list-units --type=timer maas_hardware_sync.timer
  UNIT                     LOAD   ACTIVE SUB     DESCRIPTION                                      
  maas_hardware_sync.timer loaded active waiting Timer for periodically running MAAS hardware sync
</code></pre></div></div>

<p>On each host, disable and remove the timer.</p>

<div class="language-plaintext highlighter-rouge"><div class="highlight"><pre class="highlight"><code>sudo systemctl disable maas_hardware_sync.timer
sudo systemctl stop maas_hardware_sync.timer
sudo rm /lib/systemd/system/maas_hardware_sync.timer
</code></pre></div></div>

<p>In my case, these are non-production hosts, used for testing the infrastructure deployment, I chose to simply redeploy the nodes.</p>

<p><img src="/assets/images/Xnapper-2024-01-13-14.55.55.png" alt="Xnapper-2024-01-13-14.55.55.png" /></p>

<p>Then clean up the fabrics and VLANs. Using these SQL commands, two DELETE statements intended to remove records from the <code class="language-plaintext highlighter-rouge">maasserver_vlan</code> and <code class="language-plaintext highlighter-rouge">maasserver_fabric</code> tables.</p>

<div class="language-plaintext highlighter-rouge"><div class="highlight"><pre class="highlight"><code>maasdb=# DELETE FROM maasserver_vlan
	WHERE maasserver_vlan.id NOT IN (
	    SELECT maasserver_vlan.id 
	    FROM maasserver_vlan
	    LEFT JOIN maasserver_interface ON maasserver_vlan.id = maasserver_interface.vlan_id
	    WHERE maasserver_interface.vlan_id IS NOT NULL  
	)
	AND maasserver_vlan.id NOT IN (
	    SELECT maasserver_vlan.id 
	    FROM maasserver_vlan
	    JOIN maasserver_subnet ON maasserver_vlan.id = maasserver_subnet.vlan_id
	);

	DELETE FROM maasserver_fabric
	WHERE maasserver_fabric.id NOT IN (
	    SELECT maasserver_fabric.id 
	    FROM maasserver_fabric
	    LEFT JOIN maasserver_vlan ON maasserver_vlan.fabric_id = maasserver_fabric.id
	    WHERE maasserver_vlan.fabric_id IS NOT NULL
	);
</code></pre></div></div>

<p>Let’s break down each DELETE statement:</p>

<ol>
  <li>
    <p><code class="language-plaintext highlighter-rouge">DELETE FROM maasserver_vlan</code><strong>:</strong> This statement deletes VLANs (from the table <code class="language-plaintext highlighter-rouge">maasserver_vlan</code>) that are not associated with a network interface of a server (left join with <code class="language-plaintext highlighter-rouge">maasserver_interface</code> on the <code class="language-plaintext highlighter-rouge">vlan_id</code>) or used by a subnet (inner join with <code class="language-plaintext highlighter-rouge">maasserver_subnet</code> on the <code class="language-plaintext highlighter-rouge">vlan_id</code>).</p>
  </li>
  <li>
    <p><code class="language-plaintext highlighter-rouge">DELETE FROM maasserver_fabric</code><strong>:</strong> This statement deletes fabrics (from the table <code class="language-plaintext highlighter-rouge">maasserver_fabric</code>) that are not associated with a VLAN (left join with <code class="language-plaintext highlighter-rouge">maasserver_vlan</code> on the <code class="language-plaintext highlighter-rouge">fabric_id</code>).</p>
  </li>
</ol>

<p>In my case, that was <code class="language-plaintext highlighter-rouge">23902</code> VLANs and <code class="language-plaintext highlighter-rouge">23899</code> fabrics.</p>

<div class="language-plaintext highlighter-rouge"><div class="highlight"><pre class="highlight"><code>DELETE 23902
DELETE 23899
</code></pre></div></div>

<p>I had a few fabrics left over that I had to delete the subnet for first, but once I did and ran the DELETE statements again, my list was clear of extra fabrics. Now with the hosts reconfigured with my Ansible playbook, and the MicroK8s nodes joined together I have my cluster back. The periodic hardware sync is disabled and I have only the one intended fabric.</p>

<p><img src="/assets/images/2024-01-13-16-55-08.png" alt="Xnapper-2024-01-13-14.55.55.png" /></p>

<p>I am still learning how to best utilize MaaS, and sometimes I reconsider if it’s worth the added complexity. Yet, I am still using it instead of writing my own scripts to interact with the IPMI/iL02 APIs or host PXE servers. So it must be, at least for now.</p>]]></content><author><name>Nicholas Morey</name></author><category term="Technical Blog" /><category term="homelab" /><category term="maas" /><category term="bare-metal" /><category term="kubernetes" /><summary type="html"><![CDATA[On a snowy Saturday morning, I enter my office intending to test out-of-band ingress-nginx on MicroK8s. I log into my desktop and open up the MaaS dashboard to check the network configuration of my bare-metal Kubernetes nodes. When I open the page, my Fixfox window slows to a stall with spinning icons next to the fabrics. I kept refreshing the page and opening it in new tabs, but the issue persisted. I checked the subnets page to see if that would load. I was expecting to see my standard subnets, and I did, but they were accompanied by nearly a 1,000 pages of generic fabric-xxxxx entries, over 24,000 of them. In a discord call with me, as I was tearing out my hair, was Noah, who, after some brief searching, found this thread on the MaaS forum. Another user found that “the [periodic] hardware sync recognises Calico interfaces from the K8 cluster every 15 minutes and creates a fabric for each interface.” In my case, I have four physical hosts managed by MaaS with periodic sync enabled, where three of which are in a Kubernetes cluster running Microk8s. The thread acknowledges that it may be a bug. However, the proposed workaround is to disable hardware sync for the hosts running Kubernetes and edit the database to remove the erroneous fabric entries. The problem is that once hardware sync is enabled on a host, it can’t be disabled from the UI without releasing and deploying it again. But, you can edit the database entries for the hosts on MaaS to disable it. First, let’s connect to the maasdb as the postgres user. sudo su postgres psql postgres-# \l List of databases Name | Owner | Encoding | Collate | Ctype | Access privileges -----------+----------+----------+-------------+-------------+----------------------- maasdb | postgres | UTF8 | en_US.UTF-8 | en_US.UTF-8 | postgres=# \c maasdb; You are now connected to database "maasdb" as user "postgres". Then select the hosts by id and enable_hw_sync from the maasserver_node table to see what the current status is. maasdb=# select id,enable_hw_sync from maasserver_node; id | enable_hw_sync ----+---------------- 1 | f 2 | f 7 | f 5 | t 6 | t 8 | t (6 rows) In my case, I want to disable hardware sync (set enable_hw_sync to false) for all of my hosts, so I used an UPDATE statement for all records in maasserver_node. maasdb=# UPDATE maasserver_node SET enable_hw_sync = false; UPDATE 6 maasdb=# select id,enable_hw_sync from maasserver_node; id | enable_hw_sync ----+---------------- 1 | f 2 | f 7 | f 5 | f 6 | f 8 | f (6 rows) Turns out, there is also a systemd timer named maas_hardware_sync on each host to clean up. I found that out by watching the fabrics get added in real-time after I thought I had cleaned them up. ubuntu@rubrik-c:~$ sudo systemctl list-units --type=timer maas_hardware_sync.timer UNIT LOAD ACTIVE SUB DESCRIPTION maas_hardware_sync.timer loaded active waiting Timer for periodically running MAAS hardware sync On each host, disable and remove the timer. sudo systemctl disable maas_hardware_sync.timer sudo systemctl stop maas_hardware_sync.timer sudo rm /lib/systemd/system/maas_hardware_sync.timer In my case, these are non-production hosts, used for testing the infrastructure deployment, I chose to simply redeploy the nodes. Then clean up the fabrics and VLANs. Using these SQL commands, two DELETE statements intended to remove records from the maasserver_vlan and maasserver_fabric tables. maasdb=# DELETE FROM maasserver_vlan WHERE maasserver_vlan.id NOT IN ( SELECT maasserver_vlan.id FROM maasserver_vlan LEFT JOIN maasserver_interface ON maasserver_vlan.id = maasserver_interface.vlan_id WHERE maasserver_interface.vlan_id IS NOT NULL ) AND maasserver_vlan.id NOT IN ( SELECT maasserver_vlan.id FROM maasserver_vlan JOIN maasserver_subnet ON maasserver_vlan.id = maasserver_subnet.vlan_id ); DELETE FROM maasserver_fabric WHERE maasserver_fabric.id NOT IN ( SELECT maasserver_fabric.id FROM maasserver_fabric LEFT JOIN maasserver_vlan ON maasserver_vlan.fabric_id = maasserver_fabric.id WHERE maasserver_vlan.fabric_id IS NOT NULL ); Let’s break down each DELETE statement: DELETE FROM maasserver_vlan: This statement deletes VLANs (from the table maasserver_vlan) that are not associated with a network interface of a server (left join with maasserver_interface on the vlan_id) or used by a subnet (inner join with maasserver_subnet on the vlan_id). DELETE FROM maasserver_fabric: This statement deletes fabrics (from the table maasserver_fabric) that are not associated with a VLAN (left join with maasserver_vlan on the fabric_id). In my case, that was 23902 VLANs and 23899 fabrics. DELETE 23902 DELETE 23899 I had a few fabrics left over that I had to delete the subnet for first, but once I did and ran the DELETE statements again, my list was clear of extra fabrics. Now with the hosts reconfigured with my Ansible playbook, and the MicroK8s nodes joined together I have my cluster back. The periodic hardware sync is disabled and I have only the one intended fabric. I am still learning how to best utilize MaaS, and sometimes I reconsider if it’s worth the added complexity. Yet, I am still using it instead of writing my own scripts to interact with the IPMI/iL02 APIs or host PXE servers. So it must be, at least for now.]]></summary></entry><entry><title type="html">Why I Hate Mac: Linux Teleprompter Setup</title><link href="https://morey.tech/life%20blog/Why-I-Hate-Mac-Linux-Teleprompter-Setup.md/" rel="alternate" type="text/html" title="Why I Hate Mac: Linux Teleprompter Setup" /><published>2023-12-03T19:00:00-05:00</published><updated>2023-12-03T19:00:00-05:00</updated><id>https://morey.tech/life%20blog/Why-I-Hate-Mac-Linux-Teleprompter-Setup.md</id><content type="html" xml:base="https://morey.tech/life%20blog/Why-I-Hate-Mac-Linux-Teleprompter-Setup.md/"><![CDATA[<p>I’ve spent the last year as a Developer Advocate at Akuity, where I regularly record <a href="https://www.youtube.com/playlist?list=PLuS3Nu-blsSft5xQ4I2gUWzecGrW9J1sx">videos for YouTube</a>. Every time I show a draft of my videos to my marketing manager, his immediate response is:</p>

<p><img src="/assets/images/Xnapper-2023-12-04-19.03.50.png" alt="Xnapper-2023-12-04-19.03.50.png" /></p>

<p><img src="/assets/images/2023-12-03-10-14-55.png" alt="Example of me looking at the screen in a video, before I had a teleprompter." /></p>

<blockquote>
  <p>Example of me looking at the screen in a video, before I had a teleprompter.</p>
</blockquote>

<p>Which turns out to be a particularly challenging problem to solve. I initially thought nobody would care if I was not looking at the camera; it’s a YouTube video after all, not a conversation. But the more I looked around at other creators’ videos, the more I could feel the difference.</p>

<p>It’s such a basic human need to have eye contact, even if you aren’t actually talking to the person. It provides a level of engagement that you can’t get if you feel like the person is just reading something from their screen; it’s not authentic.</p>

<p>So, I set out to make eye contact with the camera in my next video. In my initial search, I found many half-baked free solutions. Such as moving the window with the text directly below my camera to make it appear that I’m looking at the camera while I’m reading. While this technically solves the problem, it would mean constantly scrolling up the text to avoid looking away from the camera. Others included putting the webcam on a tripod or a plexiglass rig to hang it in front of the monitor, which was more hassle.</p>

<p>They weren’t practical for me. I wanted the lowest possible barrier between recording a talking-head shot for a video and showing something on my main monitor. Putting something over my screen, limiting my windows while recording, and pulling out a tripod isn’t what I had in mind.</p>

<p>I did some more digging until I was finally reminded of a device I hadn’t thought of for years but was built for exactly this purpose: a teleprompter! Right away, I knew this would solve my problem with elegance and grace despite the upfront cost.</p>

<h1 id="why-i-hate-mac">Why I hate Mac</h1>

<p>I had initially sought to use my teleprompter set up with my MacBook. It seemed easy enough; I needed a teleprompter and a small screen, and it was conveniently Cyber Monday at the time, so I took advantage of the deals. I had a spare webcam and a tripod to use, too.</p>

<p>The unexpected (but I should have seen coming) challenge was configuring the display to reflect (mirror) the output so that it would show correctly on the mirror in the teleprompter. I was initially optimistic in thinking that the display settings on OSX would have an option for this, but sadly, they do not. My second hope was that the portable display I purchased would have an option for it; as you can probably guess, it did not.</p>

<p>After much searching around, I found <a href="https://www.reddit.com/r/Zoom/comments/13zjpb8/flip_display_horizontally_for_teleprompter_on/">this post</a> on Reddit (doesn’t it always come down to a post on Reddit?) where the author explained how they accomplished mirroring their display for a teleprompter with an app called <a href="https://github.com/waydabber/BetterDisplay">Better Display</a>.</p>

<p>Better Display would create a “virtual” display that is associated with the display you want to mirror. You would then stream the virtual display’s reflected (mirrored) contents to the real display. This worked in a basic sense that I could now read the text displayed on my teleprompter, but everything around it sucked.</p>

<p>In addition to my stubbornness on how there should be a free solution, I was left with the real display still presented to my MacBook as a valid display, causing windows to open on it. But I couldn’t see the windows because the virtual display was streaming to it. As you can imagine, this was incredibly frustrating.</p>

<p>I have other gripes with OSX for content creation, too, like all the hoops I’m required to jump through to capture output audio in OBS (although it appears that this was <a href="https://obsproject.com/kb/macos-desktop-audio-capture-guide">addressed in recent versions</a>).</p>

<p>I thought to myself, I bet I can do this on Linux with very little effort. A quick Google search confirmed as much. So, this final straw with the teleprompter pushed me back to using Linux for my desktop environment and recording videos. With Linux, I can have the level of control I need without relying on purchasing software to solve every problem.</p>

<p>I suppose the irony is that I used a $1,500 PC I had in my closet to solve a problem that I could’ve solved for $20.</p>

<h1 id="the-setup">The Setup</h1>

<p>My teleprompter setup consists of:</p>

<ul>
  <li><a href="https://www.amazon.ca/dp/B0BCW58B7S?psc=1&amp;ref=ppx_yo2ov_dt_b_product_details">NEEWER Teleprompter X14 PRO</a></li>
  <li><a href="https://www.amazon.ca/dp/B09237LL5Q?psc=1&amp;ref=ppx_yo2ov_dt_b_product_details">ViewSonic VA1655 15.6 Inch 1080p Portable Monitor</a></li>
  <li><a href="https://www.amazon.ca/dp/B085TFF7M1?ref=nb_sb_ss_w_as-reorder_k0_1_3&amp;amp=&amp;crid=1BFG81LIHFPXV&amp;sprefix=web&amp;th=1">Logitech C920x Webcam</a></li>
  <li>Desktop running <a href="https://pop.system76.com/">Pop!_OS</a> (Ubuntu) 22.04</li>
  <li><a href="https://www.amazon.ca/dp/B072Q42GXQ?psc=1&amp;ref=ppx_yo2ov_dt_b_product_details">NEEWER Dimmable LED Light</a></li>
  <li><a href="https://www.amazon.ca/dp/B096FQ6WKV?psc=1&amp;ref=ppx_yo2ov_dt_b_product_details">VIJIM LS02 Camera Desk Mount Stand</a></li>
</ul>

<p><img src="/assets/images/IMG_1340.jpeg" alt="IMG_1340.JPEG" /></p>

<h2 id="the-display">The Display</h2>

<p>It’s common for content creators to use a teleprompter with an iPad (or any tablet) and some app to display the text they want to read mirrored so that it reads correctly. I found that the approach was not flexible enough for me. I wanted to have a full-fledged display attached to my workstation that just happened to be on a teleprompter. In addition to recording videos, this allows me to use my teleprompter for Zoom calls, maintaining eye contact while giving light-weight demos (I say light-weight because the display is still small so I can get the level of detail that I can on my main 32” 1440p display).</p>

<p>I purchased a portable monitor, specifically the ViewSonic VA1655 to address this. I chose this model because it was:</p>

<p>(a) on sale at the time,</p>

<p>(b) fairly large for a portable display at 15.6”,</p>

<p>and (c) from a brand I recognized.</p>

<p>I can easily remove the display from the teleprompter rig. Therefore, it serves the dual purpose of a portable display that can be connected to my laptop with a single USB-C cable when I travel.</p>

<p>The advantage of using Linux with my teleprompter setup is that it was a single command to mirror the contents of the display: <code class="language-plaintext highlighter-rouge">xrandr --output HDMI-0 --reflect x</code> (where <code class="language-plaintext highlighter-rouge">HDMI-0</code> is the display on the teleprompter). And this even persisted between reboots. My motherboard doesn’t support a display connection over the USB-C port, so I connect the portable display with HDMI and power it with USB-C.</p>

<h2 id="the-camera-and-lighting">The Camera and Lighting</h2>

<p>I already had a spare <a href="https://www.amazon.ca/dp/B085TFF7M1?ref=nb_sb_ss_w_as-reorder_k0_1_3&amp;amp=&amp;crid=1BFG81LIHFPXV&amp;sprefix=web&amp;th=1">Logitech C920x webcam</a> lying around, so I chose to use that. While this does work, the webcam requires plenty of light in the room to capture a good image from inside the teleprompter. This led me to upgrade from my small USB-powered lights to a pair of <a href="https://www.amazon.ca/dp/B072Q42GXQ?psc=1&amp;ref=ppx_yo2ov_dt_b_product_details">NEEWER Dimmable LED Lights</a>, providing a bright, warm light that fills the whole room.</p>

<p>The webcam is adequate for now, but the image is not particularly sharp, and there’s no depth. I see myself upgrading to <a href="https://sonyphotoreview.com/how-to-use-sony-a6000-as-a-webcam/">a mirrorless Sony camera with a Sigma 16mm lens</a> to boost the video quality of my talking-head shots.</p>

<h1 id="the-final-look">The Final Look</h1>
<p>I’m not 100% satisfied with the final quality of the image. The framing on the corner of my office with the door is not an ideal background. Something I wish I had considered before committing to the position of the teleprompter on my desk by zip-tying the cables into place. The simple solution is to move my desk in the room.</p>

<p>But compared to what it was before, I love it.</p>

<p><img src="/assets/images/2023-12-03-10-14-55.png" alt="Example of me looking at the screen in a video, before I had a teleprompter." /></p>

<blockquote>
  <p>Example of me looking at the screen in a video, before I had a teleprompter.</p>
</blockquote>

<p><img src="/assets/images/2023-12-03-10-50-38.png" alt="Example of me reading from the teleprompter in the new setup." /></p>

<blockquote>
  <p>Example of me reading from the teleprompter in the new setup.</p>
</blockquote>

<p>The eye contact, at least for me, makes a noticeable difference in the level of engagement as the viewer. I tried it out during the company office hours and some impromptu huddles on Slack by putting the window on the teleprompter screen and turning to look at it when I talked or when engaged in conversation. It made me feel much more engaged in what we were discussing.</p>

<p>The accidental real improvement came from the warm colour temperature of the new studio lights. As my partner phrased it: “You looked like a zombie before, all gray and washed out. Now you look alive, vibrant.” I feel like I’m giving a lively presentation when I record now instead of giving a lecture.</p>

<h1 id="the-next-stage">The Next Stage</h1>

<p>The two improvements I see for this setup in the future are:</p>

<ul>
  <li>replacing the Logitech webcam with a Sony mirrorless camera, and</li>
  <li>using OBS as a webcam to easily switch between my main monitor webcam and my teleprompter in meetings using my Streamdeck.</li>
</ul>

<p>If you have any advice on either of these or anything else, leave a comment!</p>]]></content><author><name>Nicholas Morey</name></author><category term="Life Blog" /><category term="battlestation" /><category term="personal" /><summary type="html"><![CDATA[I’ve spent the last year as a Developer Advocate at Akuity, where I regularly record videos for YouTube. Every time I show a draft of my videos to my marketing manager, his immediate response is: Example of me looking at the screen in a video, before I had a teleprompter. Which turns out to be a particularly challenging problem to solve. I initially thought nobody would care if I was not looking at the camera; it’s a YouTube video after all, not a conversation. But the more I looked around at other creators’ videos, the more I could feel the difference. It’s such a basic human need to have eye contact, even if you aren’t actually talking to the person. It provides a level of engagement that you can’t get if you feel like the person is just reading something from their screen; it’s not authentic. So, I set out to make eye contact with the camera in my next video. In my initial search, I found many half-baked free solutions. Such as moving the window with the text directly below my camera to make it appear that I’m looking at the camera while I’m reading. While this technically solves the problem, it would mean constantly scrolling up the text to avoid looking away from the camera. Others included putting the webcam on a tripod or a plexiglass rig to hang it in front of the monitor, which was more hassle. They weren’t practical for me. I wanted the lowest possible barrier between recording a talking-head shot for a video and showing something on my main monitor. Putting something over my screen, limiting my windows while recording, and pulling out a tripod isn’t what I had in mind. I did some more digging until I was finally reminded of a device I hadn’t thought of for years but was built for exactly this purpose: a teleprompter! Right away, I knew this would solve my problem with elegance and grace despite the upfront cost. Why I hate Mac I had initially sought to use my teleprompter set up with my MacBook. It seemed easy enough; I needed a teleprompter and a small screen, and it was conveniently Cyber Monday at the time, so I took advantage of the deals. I had a spare webcam and a tripod to use, too. The unexpected (but I should have seen coming) challenge was configuring the display to reflect (mirror) the output so that it would show correctly on the mirror in the teleprompter. I was initially optimistic in thinking that the display settings on OSX would have an option for this, but sadly, they do not. My second hope was that the portable display I purchased would have an option for it; as you can probably guess, it did not. After much searching around, I found this post on Reddit (doesn’t it always come down to a post on Reddit?) where the author explained how they accomplished mirroring their display for a teleprompter with an app called Better Display. Better Display would create a “virtual” display that is associated with the display you want to mirror. You would then stream the virtual display’s reflected (mirrored) contents to the real display. This worked in a basic sense that I could now read the text displayed on my teleprompter, but everything around it sucked. In addition to my stubbornness on how there should be a free solution, I was left with the real display still presented to my MacBook as a valid display, causing windows to open on it. But I couldn’t see the windows because the virtual display was streaming to it. As you can imagine, this was incredibly frustrating. I have other gripes with OSX for content creation, too, like all the hoops I’m required to jump through to capture output audio in OBS (although it appears that this was addressed in recent versions). I thought to myself, I bet I can do this on Linux with very little effort. A quick Google search confirmed as much. So, this final straw with the teleprompter pushed me back to using Linux for my desktop environment and recording videos. With Linux, I can have the level of control I need without relying on purchasing software to solve every problem. I suppose the irony is that I used a $1,500 PC I had in my closet to solve a problem that I could’ve solved for $20. The Setup My teleprompter setup consists of: NEEWER Teleprompter X14 PRO ViewSonic VA1655 15.6 Inch 1080p Portable Monitor Logitech C920x Webcam Desktop running Pop!_OS (Ubuntu) 22.04 NEEWER Dimmable LED Light VIJIM LS02 Camera Desk Mount Stand The Display It’s common for content creators to use a teleprompter with an iPad (or any tablet) and some app to display the text they want to read mirrored so that it reads correctly. I found that the approach was not flexible enough for me. I wanted to have a full-fledged display attached to my workstation that just happened to be on a teleprompter. In addition to recording videos, this allows me to use my teleprompter for Zoom calls, maintaining eye contact while giving light-weight demos (I say light-weight because the display is still small so I can get the level of detail that I can on my main 32” 1440p display). I purchased a portable monitor, specifically the ViewSonic VA1655 to address this. I chose this model because it was: (a) on sale at the time, (b) fairly large for a portable display at 15.6”, and (c) from a brand I recognized. I can easily remove the display from the teleprompter rig. Therefore, it serves the dual purpose of a portable display that can be connected to my laptop with a single USB-C cable when I travel. The advantage of using Linux with my teleprompter setup is that it was a single command to mirror the contents of the display: xrandr --output HDMI-0 --reflect x (where HDMI-0 is the display on the teleprompter). And this even persisted between reboots. My motherboard doesn’t support a display connection over the USB-C port, so I connect the portable display with HDMI and power it with USB-C. The Camera and Lighting I already had a spare Logitech C920x webcam lying around, so I chose to use that. While this does work, the webcam requires plenty of light in the room to capture a good image from inside the teleprompter. This led me to upgrade from my small USB-powered lights to a pair of NEEWER Dimmable LED Lights, providing a bright, warm light that fills the whole room. The webcam is adequate for now, but the image is not particularly sharp, and there’s no depth. I see myself upgrading to a mirrorless Sony camera with a Sigma 16mm lens to boost the video quality of my talking-head shots. The Final Look I’m not 100% satisfied with the final quality of the image. The framing on the corner of my office with the door is not an ideal background. Something I wish I had considered before committing to the position of the teleprompter on my desk by zip-tying the cables into place. The simple solution is to move my desk in the room. But compared to what it was before, I love it. Example of me looking at the screen in a video, before I had a teleprompter. Example of me reading from the teleprompter in the new setup. The eye contact, at least for me, makes a noticeable difference in the level of engagement as the viewer. I tried it out during the company office hours and some impromptu huddles on Slack by putting the window on the teleprompter screen and turning to look at it when I talked or when engaged in conversation. It made me feel much more engaged in what we were discussing. The accidental real improvement came from the warm colour temperature of the new studio lights. As my partner phrased it: “You looked like a zombie before, all gray and washed out. Now you look alive, vibrant.” I feel like I’m giving a lively presentation when I record now instead of giving a lecture. The Next Stage The two improvements I see for this setup in the future are: replacing the Logitech webcam with a Sony mirrorless camera, and using OBS as a webcam to easily switch between my main monitor webcam and my teleprompter in meetings using my Streamdeck. If you have any advice on either of these or anything else, leave a comment!]]></summary></entry></feed>